The 30 DIY Crafts That Look Surprisingly Expensive
Creating beautiful, high-end décor for your home doesn’t require a designer budget or professional skills. With the right materials, techniques, and a bit of creativity, you can craft pieces that rival expensive store-bought items at a fraction of the cost.
This guide walks you through 30 carefully selected DIY projects that deliver sophisticated results without draining your wallet. From statement wall art and elegant textiles to refined furniture upgrades and luxurious accents, each project focuses on achievable methods that produce polished, expensive-looking finishes.
You’ll discover how simple materials like paint, wood, fabric, and metallic finishes can transform into designer-worthy pieces when applied with the right approach.
Whether you’re looking to refresh a single room or add curated touches throughout your space, these projects offer practical solutions that combine smart styling with straightforward execution. The final section covers essential materials and finishing techniques that elevate any craft from basic to boutique-quality.
1. Large-Scale Abstract Gallery Canvas with Gold Leaf Accents
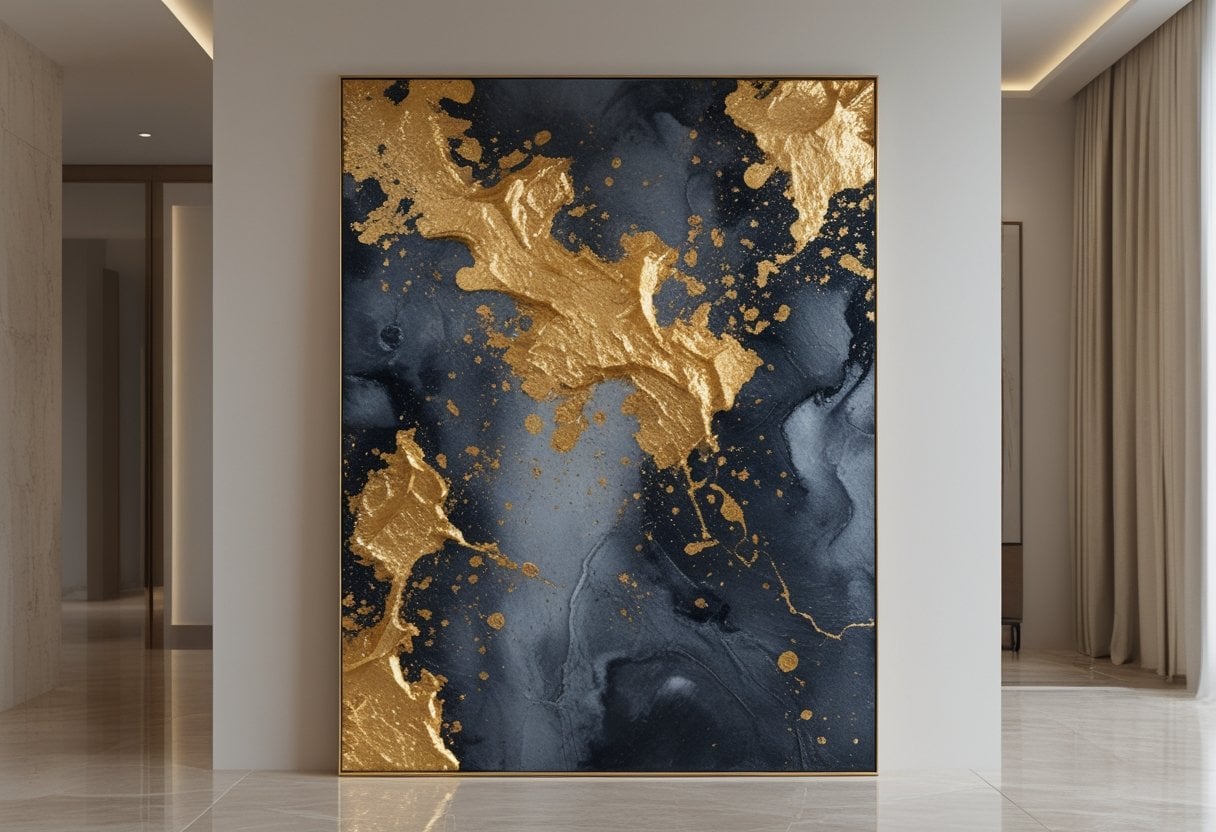
You can create museum-quality wall art using a large canvas, acrylic paints, and gold leaf sheets. Start with a blank canvas from an art supply store or repurpose an old painting from a thrift shop.
Apply your base colors using broad brushstrokes or a palette knife to build texture. Earth tones, navy blues, or even stark black and white work well as foundations. Let each layer dry completely before adding the next.
Once your base is complete, apply gold leaf to select areas using adhesive sizing. You can add metallic accents in geometric patterns, random clusters, or delicate highlights that catch the light. A palette knife helps create raised textures that make the gold leaf pop.
Finish with a layer of clear resin for a professional gallery-grade shine. This protective coating gives your artwork a glass-like surface that elevates the entire piece.
2. Marble-Look Faux Countertop Using Epoxy Resin
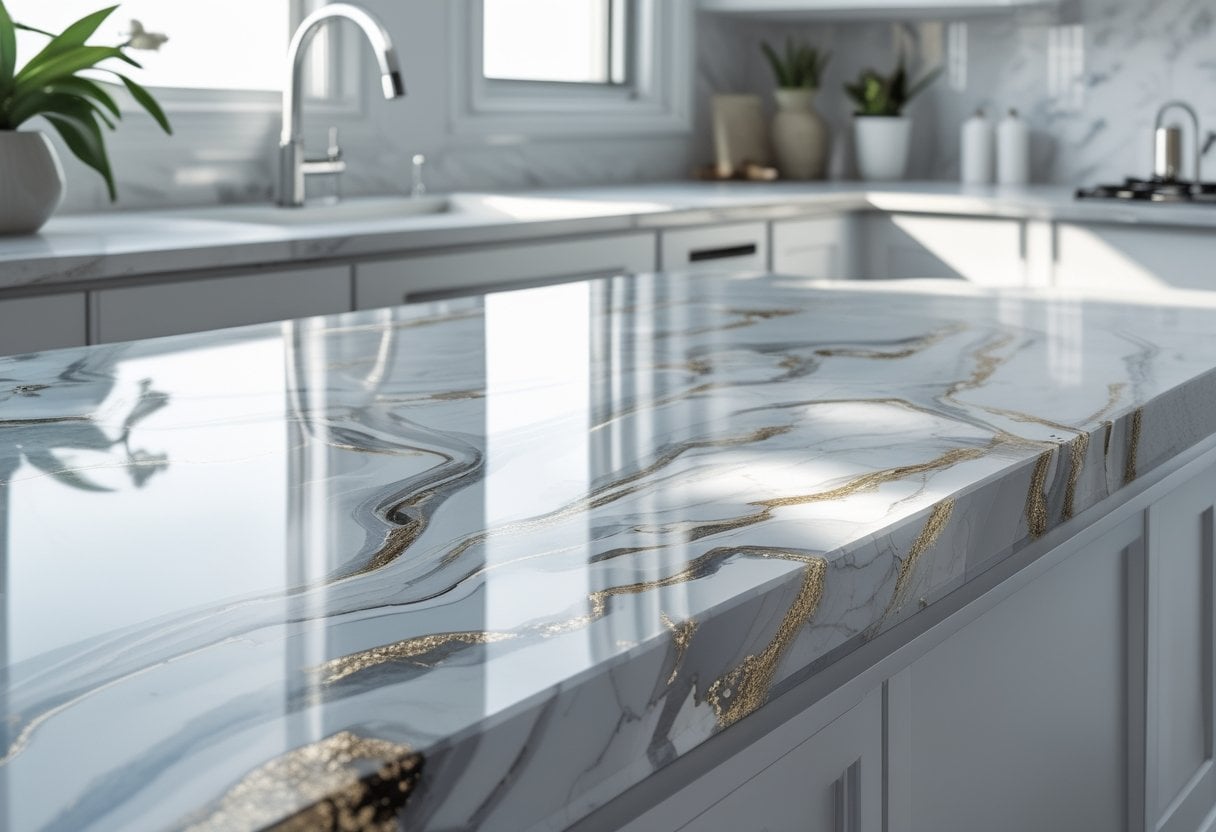
You can transform outdated countertops into elegant marble surfaces using epoxy resin. This technique works on various surfaces including laminate, melamine, and existing countertops without requiring expensive replacements.
The process involves preparing your surface with thorough cleaning and primer application. You’ll then apply epoxy resin mixed with pigments to create marble veining patterns. Some methods incorporate printed marble wallpaper beneath clear epoxy for realistic results.
The materials are affordable and readily available. Most projects require epoxy resin, mixing tools, and either paint pigments or wallpaper depending on your chosen method.
Once cured, the epoxy creates a durable, waterproof surface that mimics genuine marble. The finished countertop withstands daily kitchen use while maintaining its polished appearance. You’ll need to allow proper curing time, typically 24-72 hours, before using your newly transformed countertop.
3. Hand-Painted Ombre Accent Wall
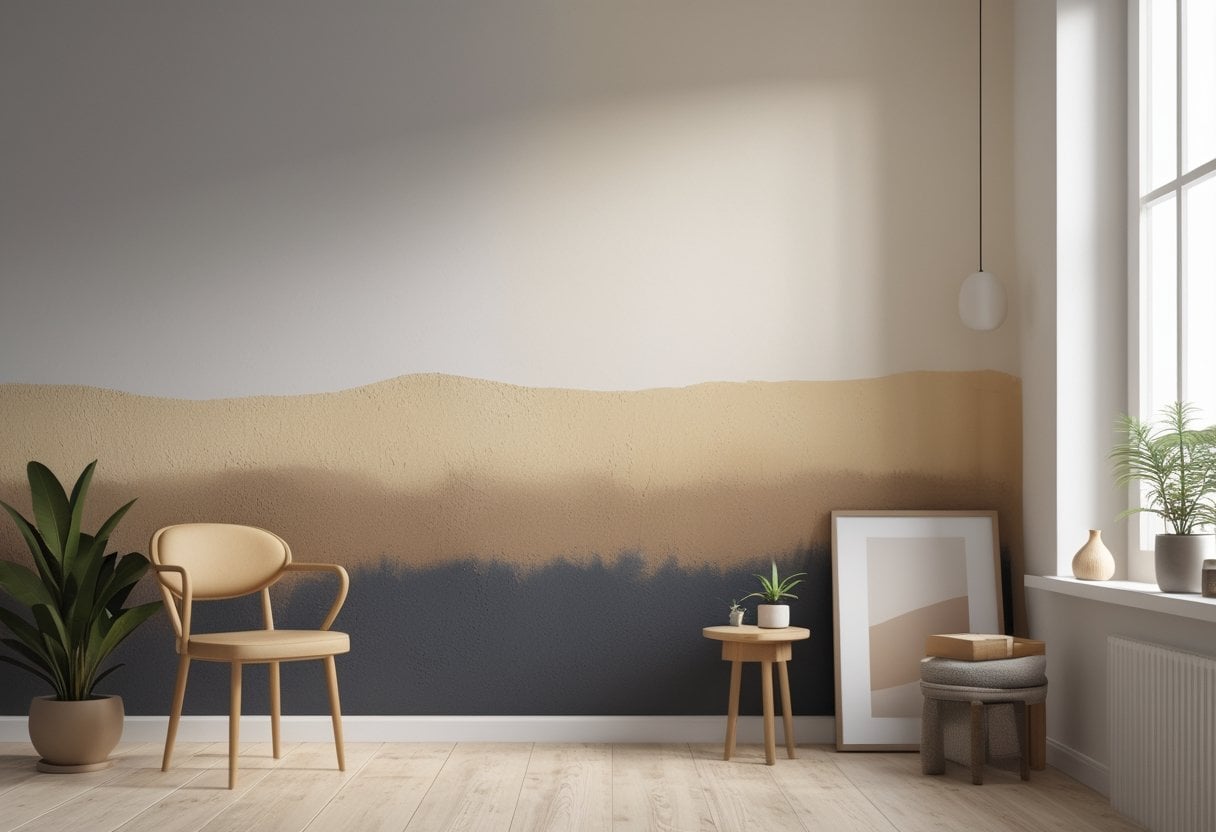
An ombre accent wall creates a sophisticated gradient effect that rivals professional interior design. You’ll achieve this high-end look using just one paint color in varying shades, transitioning from dark to light across your wall.
The technique requires basic supplies: paint, a roller, brushes, and mixing trays. You blend the colors directly on the wall while the paint is still wet, creating seamless transitions between shades.
This project works in any room and adapts to your style preferences. Choose bold colors for dramatic impact or soft pastels for subtle elegance. The gradient effect adds visual depth and dimension that makes spaces feel more expensive and curated.
The entire process takes just a few hours and costs less than traditional wallpaper or professional painting services. Your finished wall will look custom-designed without the premium price tag.
4. Reclaimed Wood Floating Shelves with Hidden Brackets
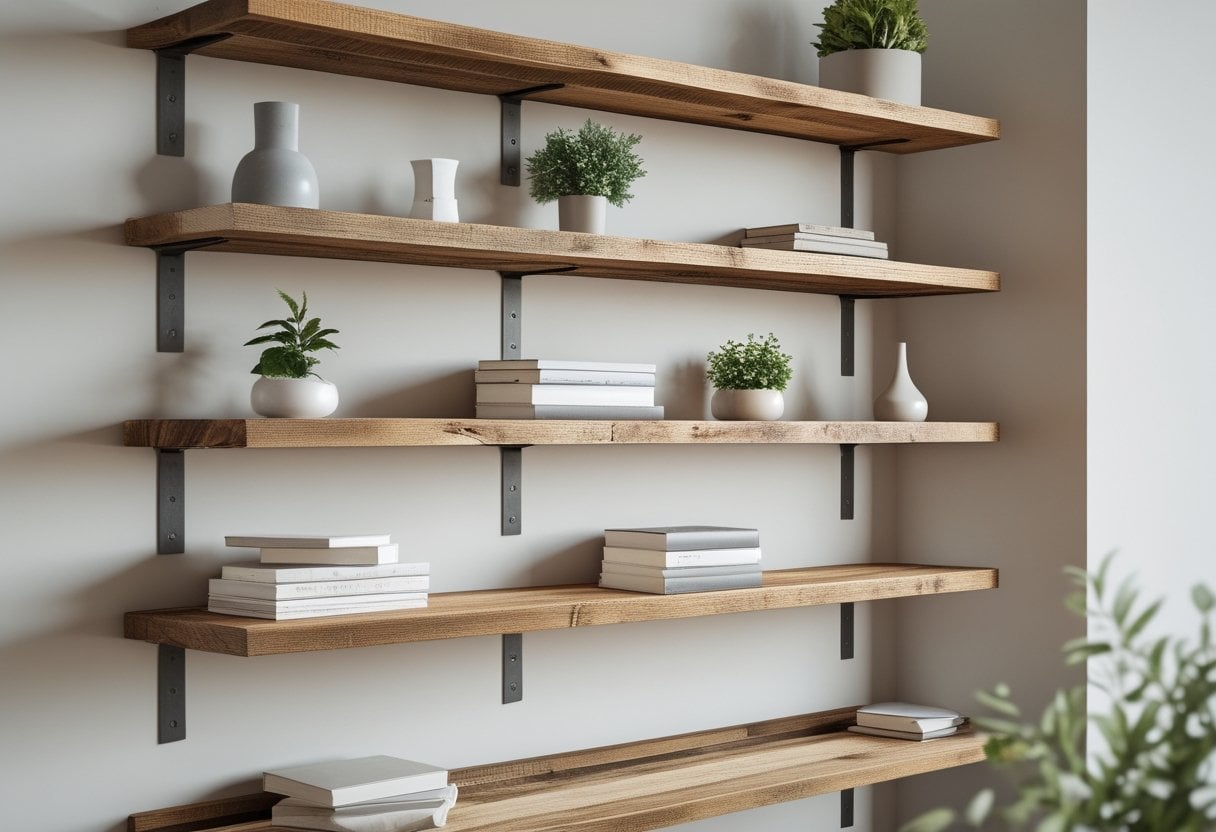
Reclaimed wood floating shelves create an upscale look without the premium price tag. The hidden bracket system makes the wood appear to hang in mid-air, adding a sophisticated touch to any room.
You can build these shelves for under $40 using reclaimed wood planks that are 8-12 inches deep. The brackets should extend at least two-thirds of your shelf’s depth for proper support. Choose wall anchors rated for at least 50 pounds to ensure stability.
The construction requires basic tools and straightforward joinery techniques. You’ll need to level, drill, and install the hidden brackets inside the shelf itself. This conceals all hardware and gives you that professional, high-end appearance.
The rustic character of reclaimed wood adds unique texture and warmth that new lumber can’t replicate.
5. DIY Concrete Planters with Brass Inlay
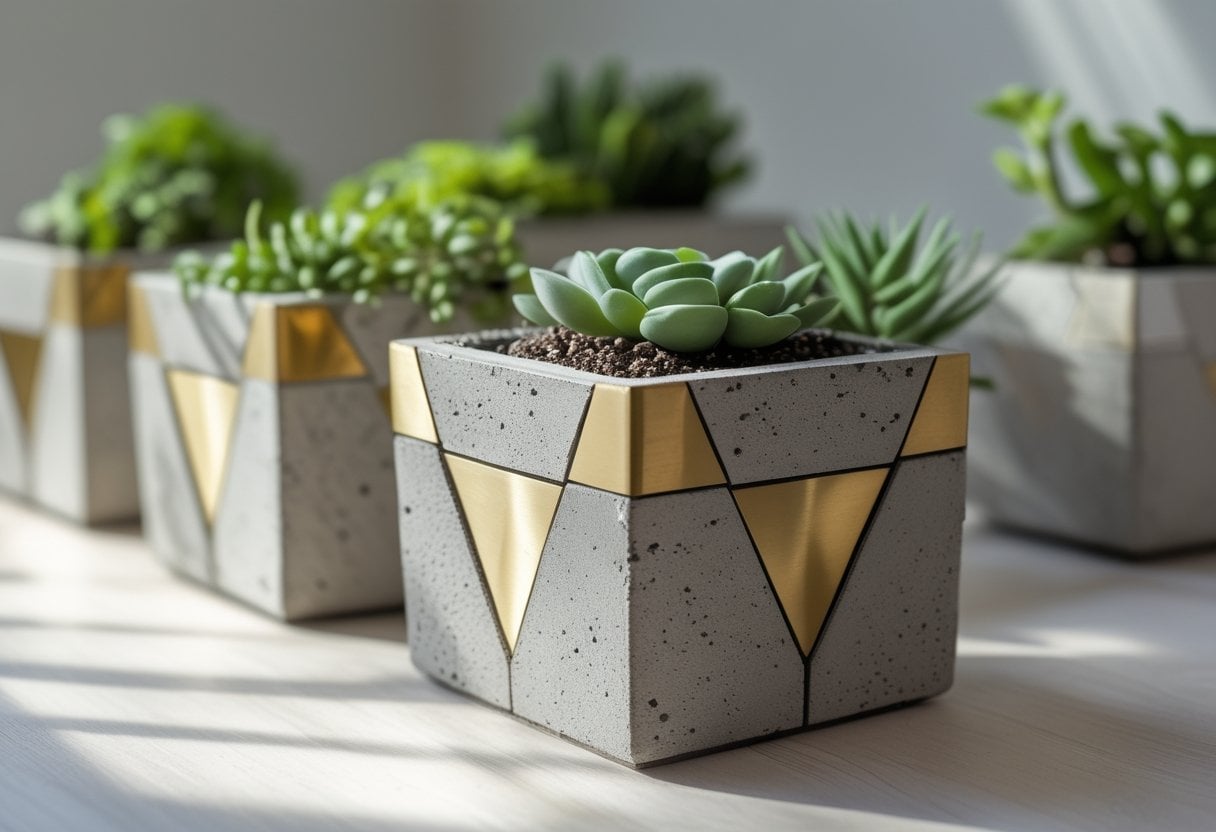
Concrete planters gain an upscale appearance when you add brass inlay designs to their surfaces. You can create these decorative accents using thin brass strips or sheets pressed into the concrete while it’s still setting.
The process is straightforward. Pour your concrete planter using simple molds made from plastic containers or cardboard forms. Before the concrete fully cures, press brass metal pieces into the surface to form geometric patterns or organic designs.
The contrast between industrial concrete and metallic brass creates a high-end look found in designer home stores. You can customize the inlay patterns to match your decor style, from minimalist lines to intricate geometric shapes.
These planters work well both indoors and outdoors. The brass develops a natural patina over time, adding character while the concrete remains durable and weather-resistant.
6. DIY Velvet Piped Throw Pillows
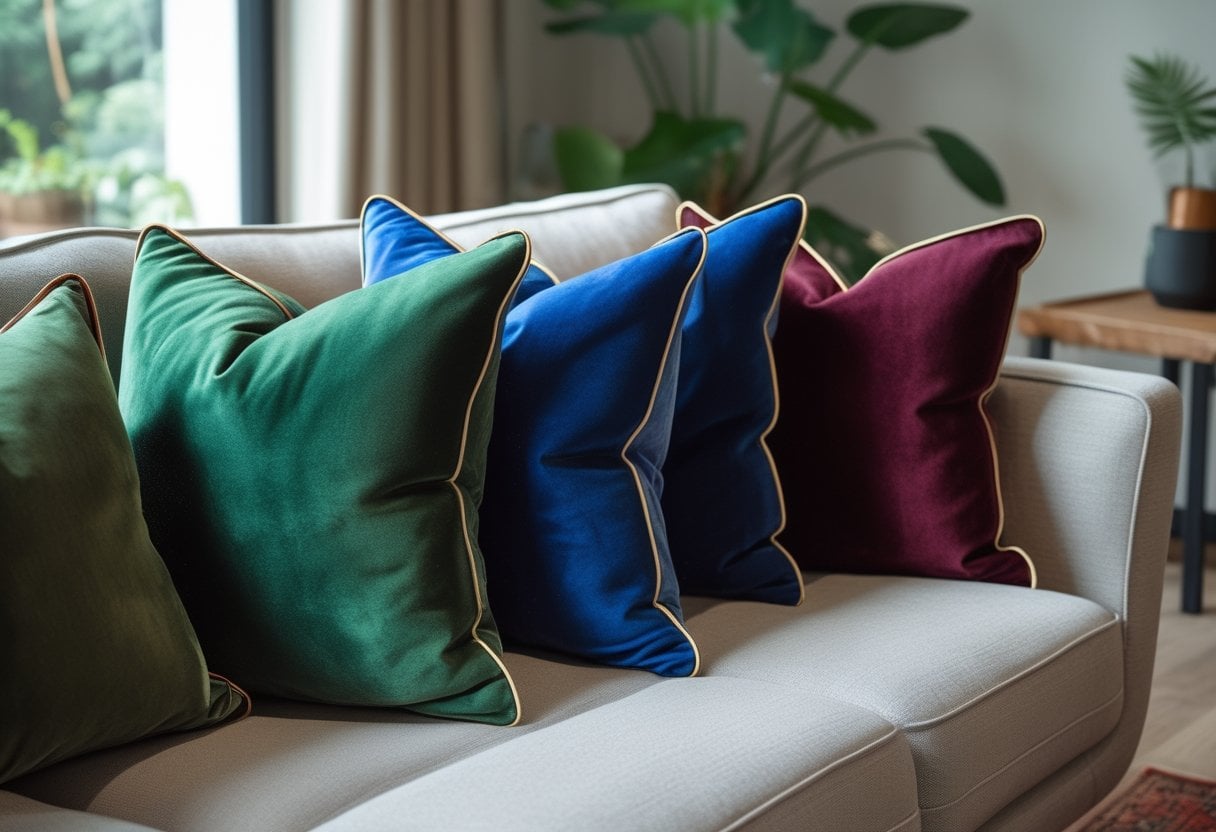
Velvet pillows with piping instantly elevate any room with a designer touch. The key to achieving that expensive look is choosing quality velvet fabric and adding contrasting piping along the seams.
You’ll need velvet fabric, piping cord, coordinating fabric for the piping, and basic sewing supplies. Cut your velvet to size and create custom piping by wrapping fabric around the cord using a zipper foot attachment.
Pin the piping around the edges of your pillow front before sewing the front and back pieces together. The piping creates clean, professional edges that mirror high-end pillows sold in boutique stores.
Choose jewel tones like emerald, sapphire, or burgundy for maximum impact. You can make envelope-style backs for easy removal and washing. Each pillow costs a fraction of retail prices while looking equally luxurious on your sofa or bed.
7. Framed Botanical Pressed-Leaf Wall Grid
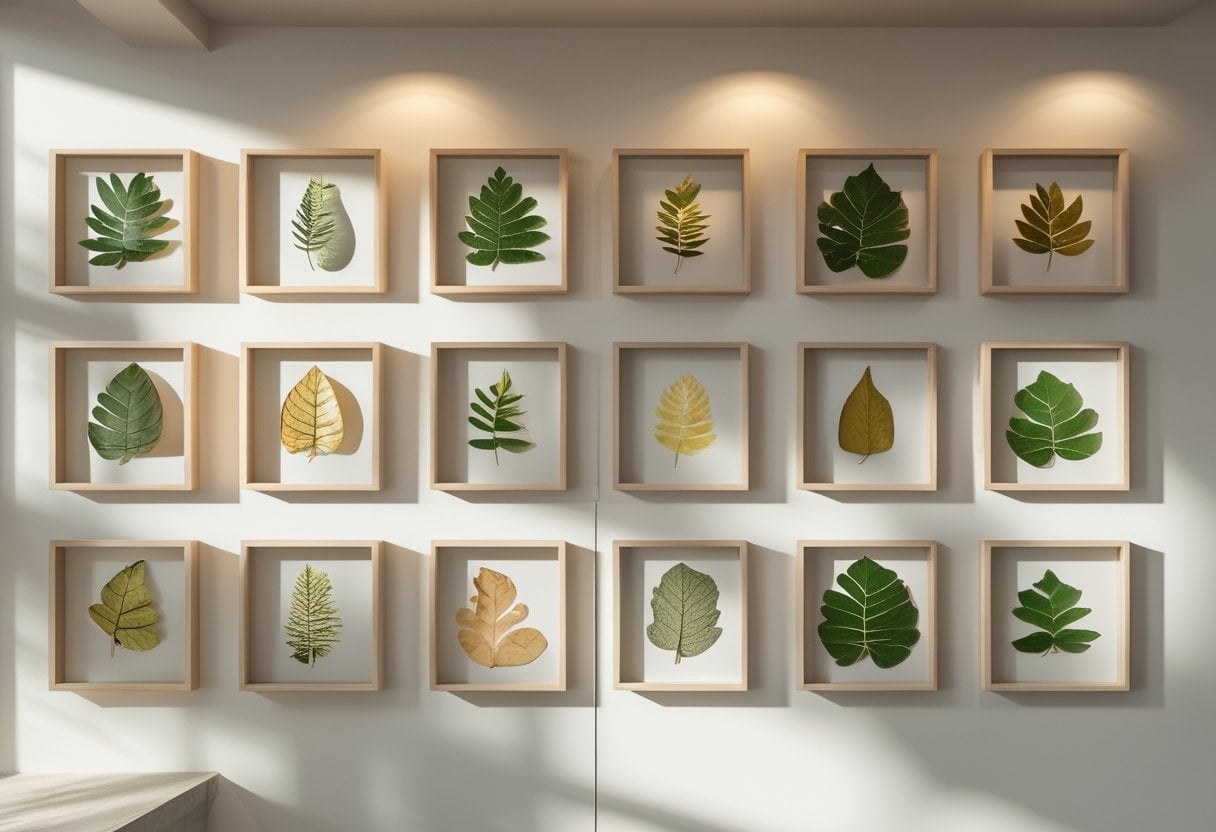
A botanical pressed-leaf wall grid delivers the refined look of gallery art without the gallery price. You’ll arrange pressed leaves in a grid pattern inside a simple frame, creating symmetry that feels intentional and curated.
Start by pressing leaves between heavy books for one to two weeks, or purchase pre-pressed botanicals to skip the waiting period. Mount each leaf on black or white cardstock using a small dot of glue, spacing them evenly to form your grid.
Choose a frame with a clean mat and clear glass to protect your work. The grid format works particularly well with matching leaf varieties, though mixing shapes adds visual interest. This project transforms basic natural materials into sophisticated wall art that rivals store-bought botanical prints.
The finished piece looks custom-designed and expensive, yet costs only the price of a frame and your time.
8. Beaded Fringe Lampshade Makeover
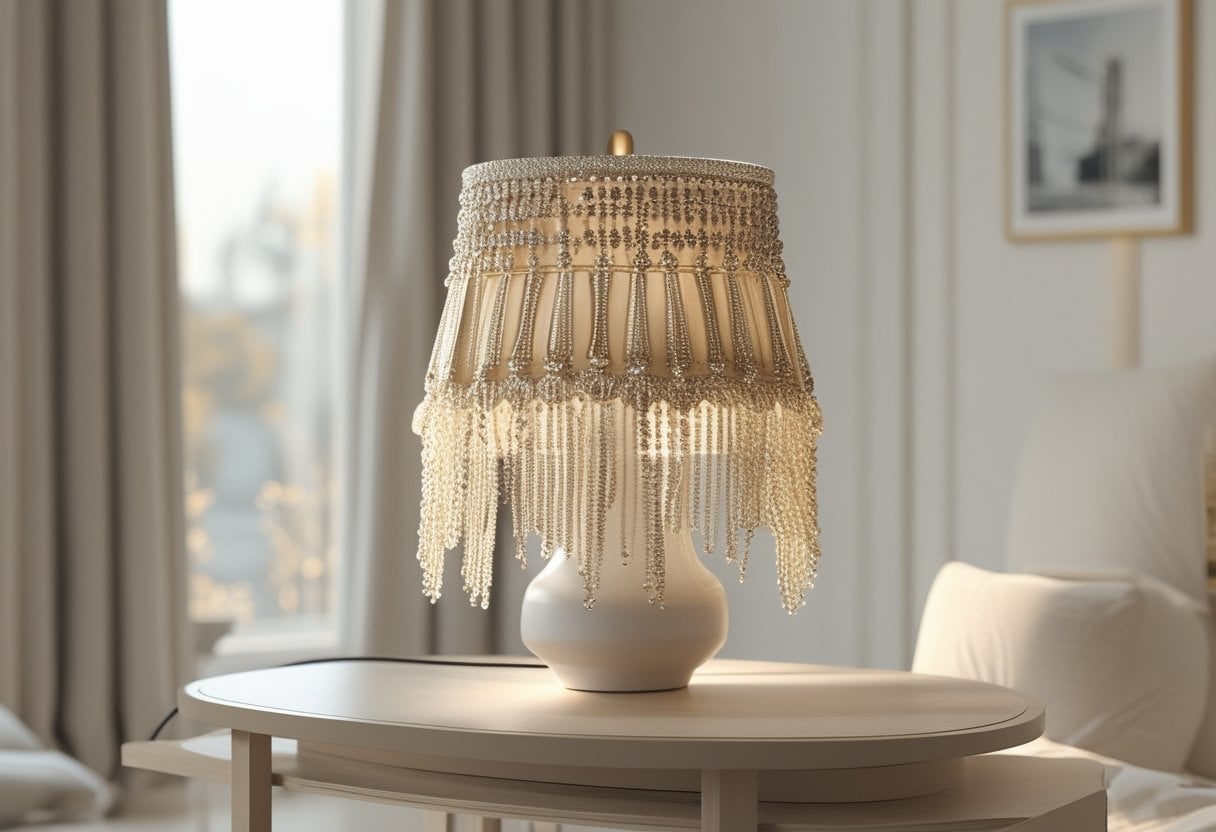
A beaded fringe lampshade transforms an ordinary lamp into a statement piece that looks custom-made. You’ll need a lampshade with a cage-type frame featuring vertical supports, such as empire or bell styles. These work best because they provide clear attachment points for your beads.
Start by selecting beads that match your decor style. String them onto thread or wire, creating strands of your desired length. Attach each beaded strand to the bottom rim of your lampshade using a hot glue gun or by tying them securely to the frame.
The beaded fringe catches and reflects light beautifully, adding dimension to any room. You can customize the look with different bead colors, sizes, and spacing patterns. This project typically costs under $20 in materials but creates a designer look that appears far more expensive.
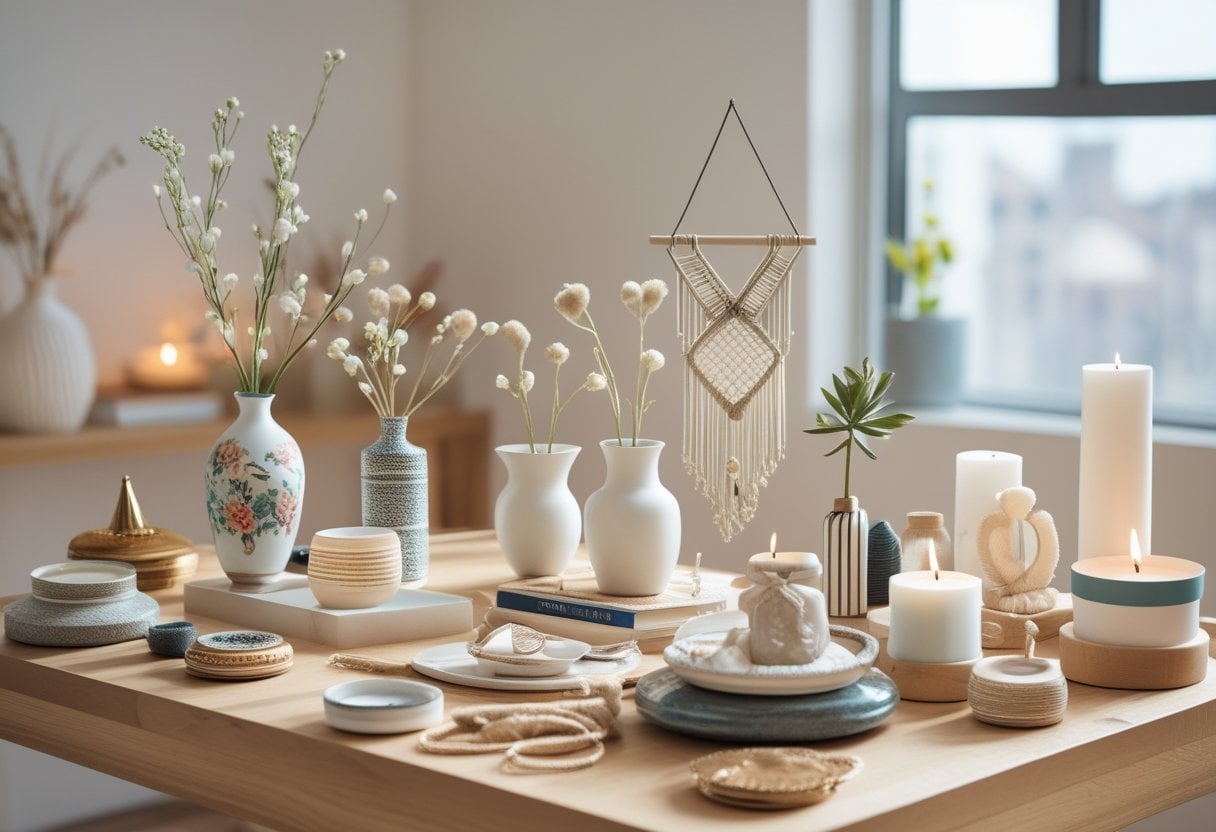
9. Gold-Dipped Glass Vases
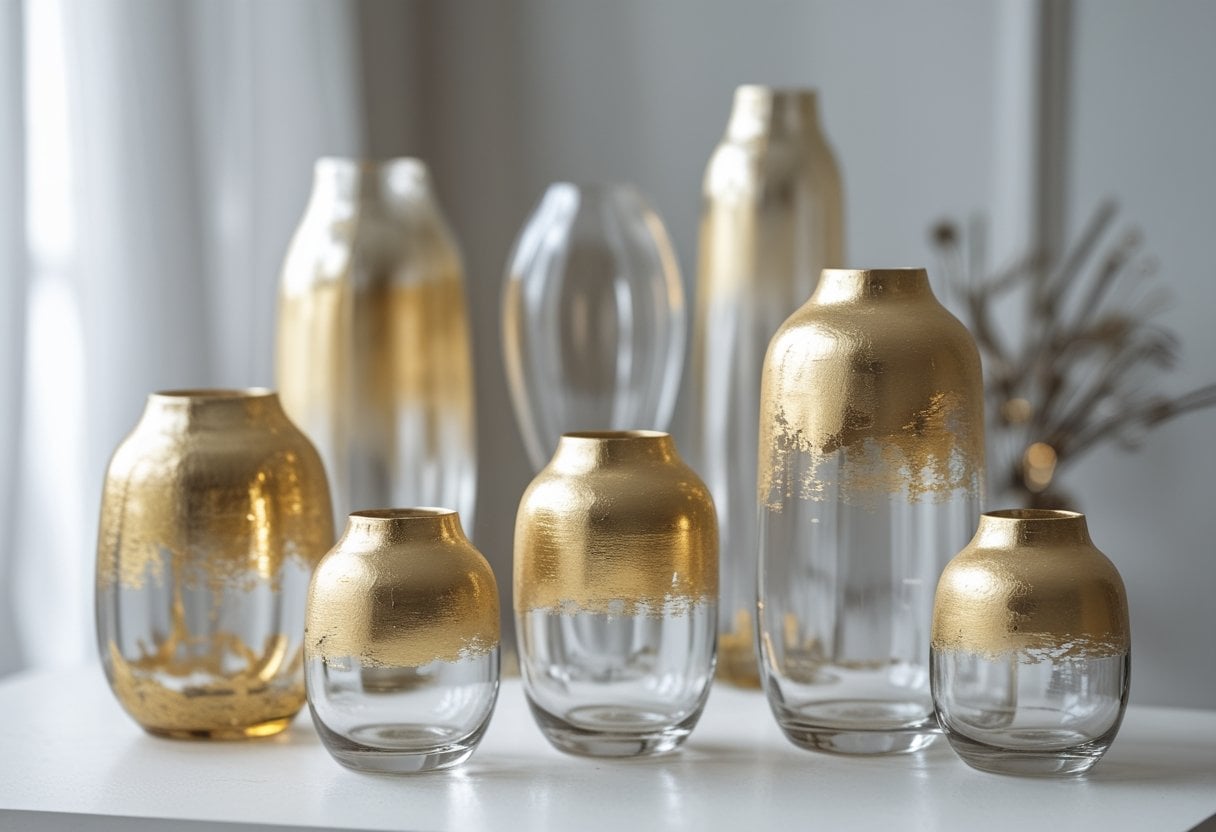
You can transform inexpensive glass vases into elegant decor pieces with metallic gold spray paint. This project requires minimal materials and creates a two-tone effect that mimics high-end home accessories.
Start by thoroughly cleaning your glass vases to remove any dust or residue. Apply painter’s tape to mark where you want the gold dipping to end, creating a clean line between the painted and clear sections.
Spray the lower portion with metallic gold paint in thin, even coats. Let each layer dry completely before adding the next one to avoid drips or uneven coverage.
The finished vases work beautifully with fresh flowers, dried arrangements, or standalone as decorative objects. You can create a cohesive look by making several vases at once, varying the heights and dipping levels for visual interest.
10. Modern Macramé Wall Hanging with Wooden Dowels
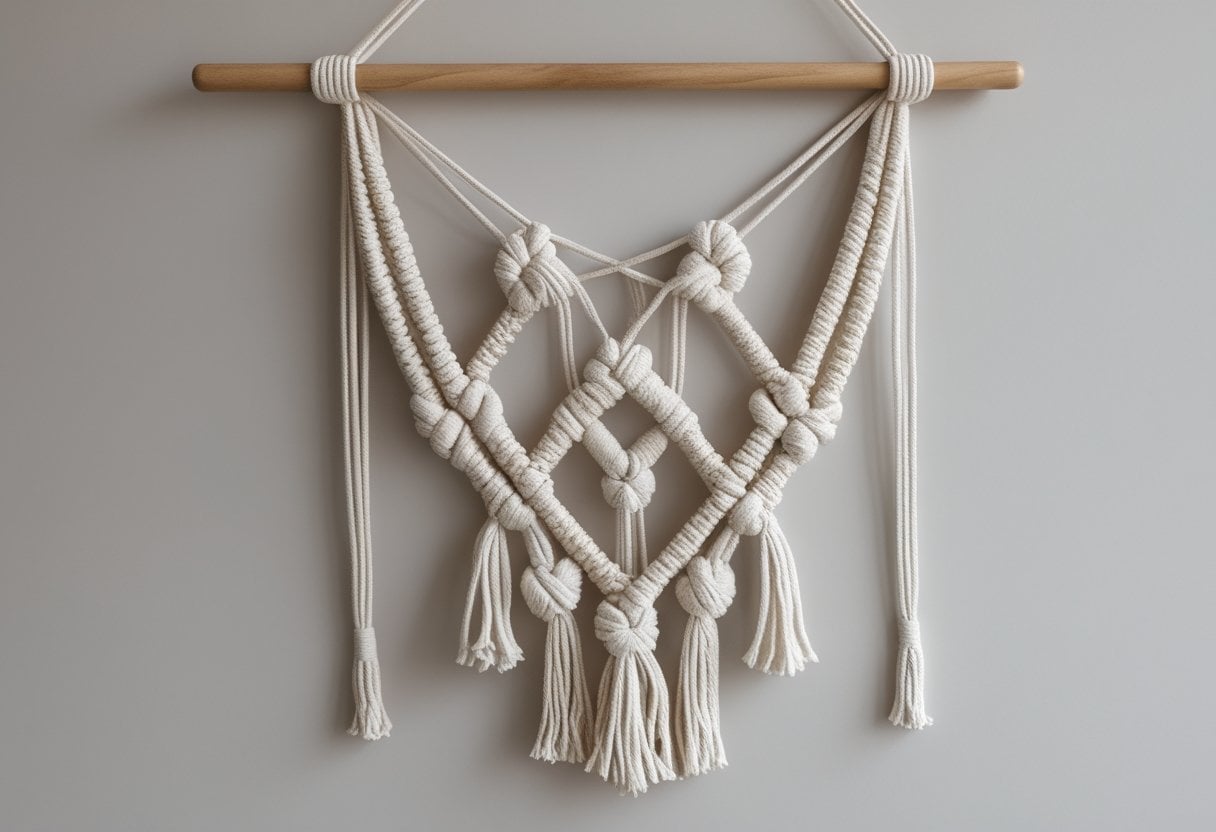
Macramé wall hangings create an upscale look without the designer price tag. You only need a wooden dowel, about 30 yards of cotton cord, and knowledge of two basic knots: the lark’s head and square knot.
The wooden dowel serves as your mounting point and can be a craft store rod, driftwood, or even a branch from your yard. Cut your cord into equal lengths and attach them to the dowel using lark’s head knots.
You can create geometric patterns by tying rows of square knots in staggered formations. A simple diamond pattern works well for beginners and delivers a sophisticated appearance. Trim the bottom fringe into a clean V-shape or straight line for a contemporary finish.
Your first piece takes 45 to 90 minutes to complete and instantly adds texture to bare walls.
11. Oversized Minimalist Line Drawing on Canvas
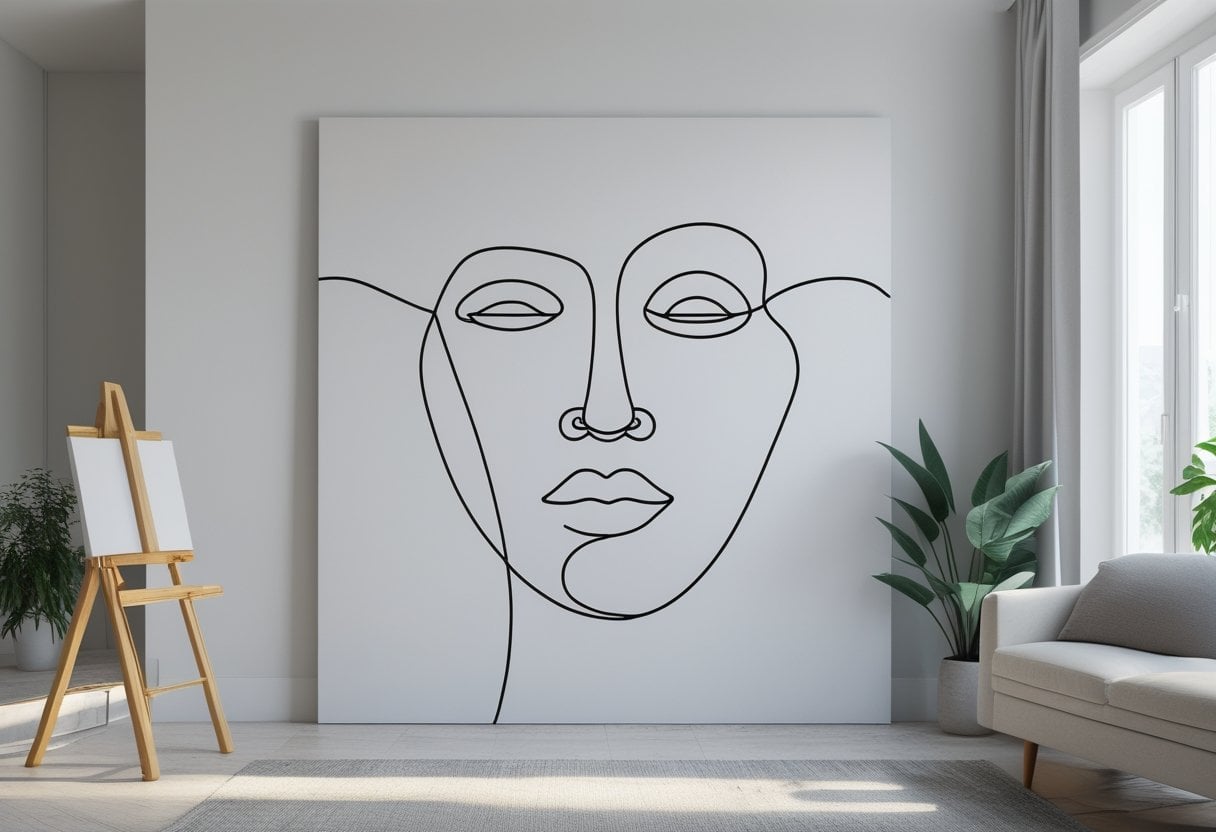
Large-scale line art transforms any room into a gallery-worthy space without requiring advanced artistic skills. You can create these impressive pieces using just a pencil, painter’s tape, and black acrylic paint on a blank canvas.
Start by sketching a continuous line design on your canvas. Abstract faces, figure studies, and organic shapes work particularly well for this style. Use painter’s tape to mask off clean edges if you prefer sharp lines, or paint freehand for a more organic feel.
The beauty of line art lies in its simplicity. A single flowing line can define an entire composition, making these pieces appear far more expensive than their actual cost. You’ll spend less than $30 on materials while creating artwork that rivals pieces selling for hundreds in home decor stores.
The minimal aesthetic complements modern, scandinavian, and contemporary interiors effortlessly.
12. Herringbone Tile Peel-and-Stick Backsplash
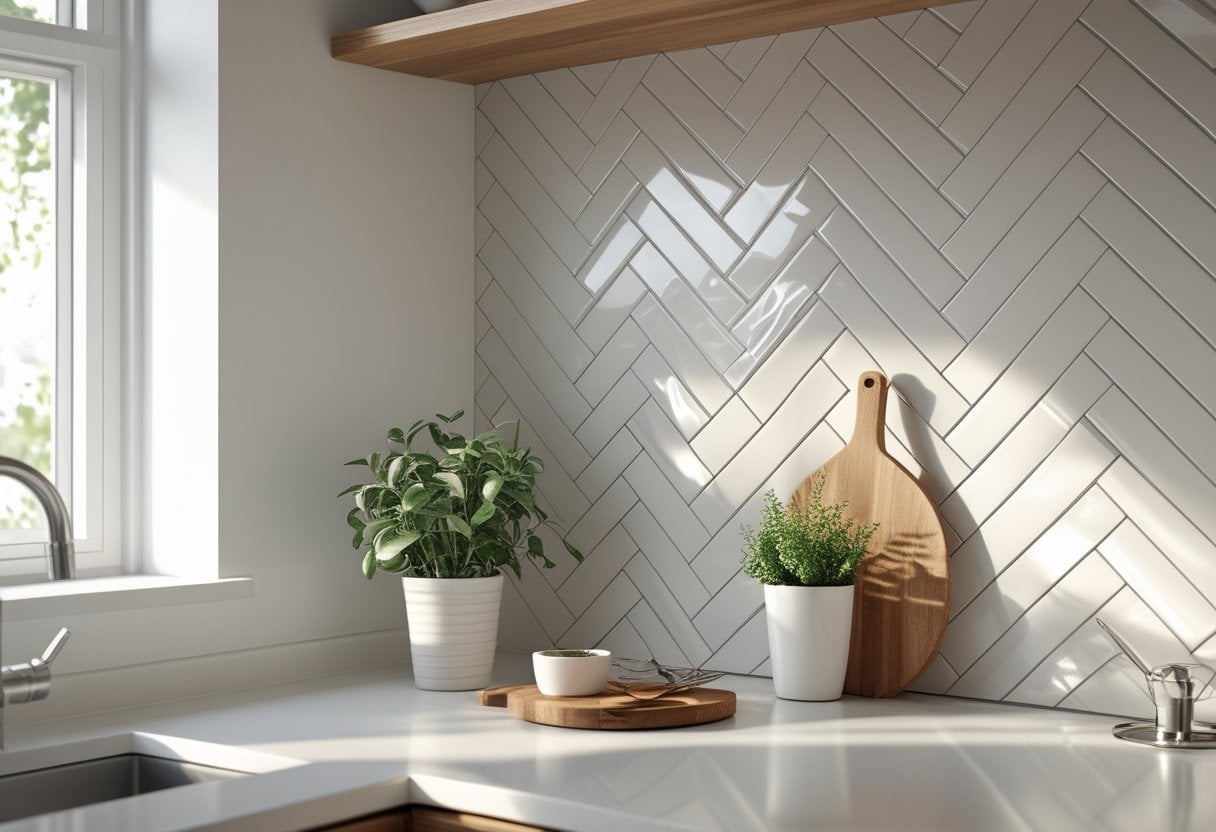
Peel-and-stick herringbone tiles offer an upscale kitchen transformation without the cost or complexity of traditional tiling. You can install these lightweight tiles in hours rather than days, with no grout or professional help required.
The herringbone pattern naturally creates visual interest and depth. Most options feature realistic textures that mimic ceramic, stone, or wood finishes.
You’ll find these tiles made from PVC composite materials that resist heat and moisture. They’re designed with strong adhesive backing that stays in place once applied. When you need to make adjustments, simply cut them with a utility knife to fit around outlets or edges.
Standard sheets measure 12×12 inches, making coverage calculations straightforward. The three-dimensional texture and varied finish options help you achieve a custom look that rivals professionally installed backsplashes at a fraction of the price.
13. Leather-Covered Decorative Storage Boxes
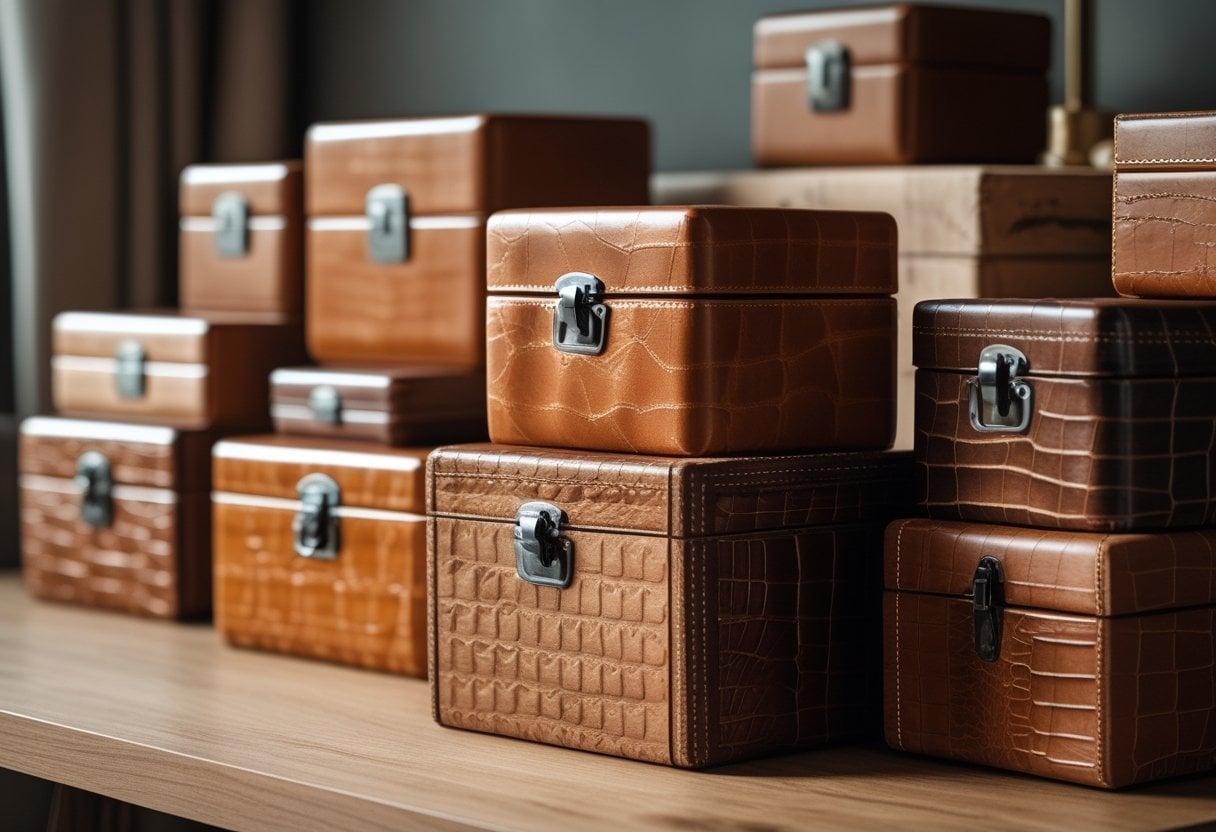
Leather-covered storage boxes deliver an upscale look without the designer price tag. You can transform plain cardboard or wooden boxes with faux leather, genuine leather scraps, or even repurposed leather materials.
The process involves measuring your box dimensions, cutting the leather to size, and securing it with strong adhesive. You can add decorative elements like metal handles, embossed patterns, or contrasting stitching for extra detail.
These boxes work well for organizing makeup, storing keepsakes, or displaying on shelves as decorative accents. Leather in rich browns, blacks, or cognac tones adds sophistication to any room. The material naturally develops character over time, making your creation look increasingly refined.
You’ll find leather remnants at craft stores or online marketplaces at reasonable prices. This project requires minimal tools and skills while producing professional-looking results.
14. Custom Monogram Brass Drawer Pulls
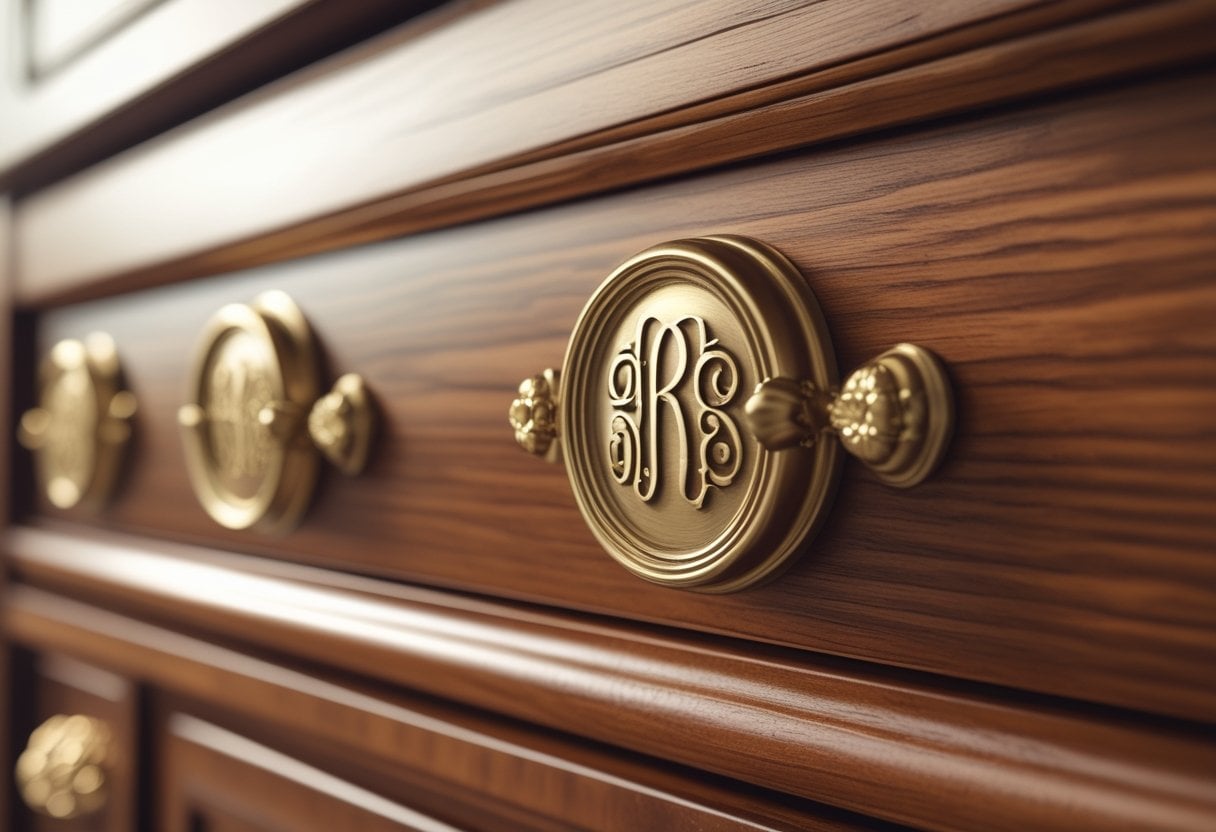
Brass drawer pulls with personalized monograms transform standard cabinets and furniture into custom pieces. You can create these by engraving or stamping your initials onto brass hardware blanks available at craft stores.
The process involves selecting unlacquered or polished brass pulls, then adding your monogram using metal stamps and a hammer. If you prefer a simpler approach, adhesive metal letters work well on flat-surfaced pulls.
These customized pulls work particularly well on dresser drawers, bathroom vanities, and kitchen cabinets. The brass material adds warmth and sophistication while the monogram provides a personalized touch that makes furniture appear commissioned rather than mass-produced.
You’ll spend around $3-7 per pull depending on the brass quality and finish you choose. This modest investment creates hardware that rivals expensive custom options from specialty retailers.
15. Sculptural Papier-Mâché Bowl with Metallic Finish
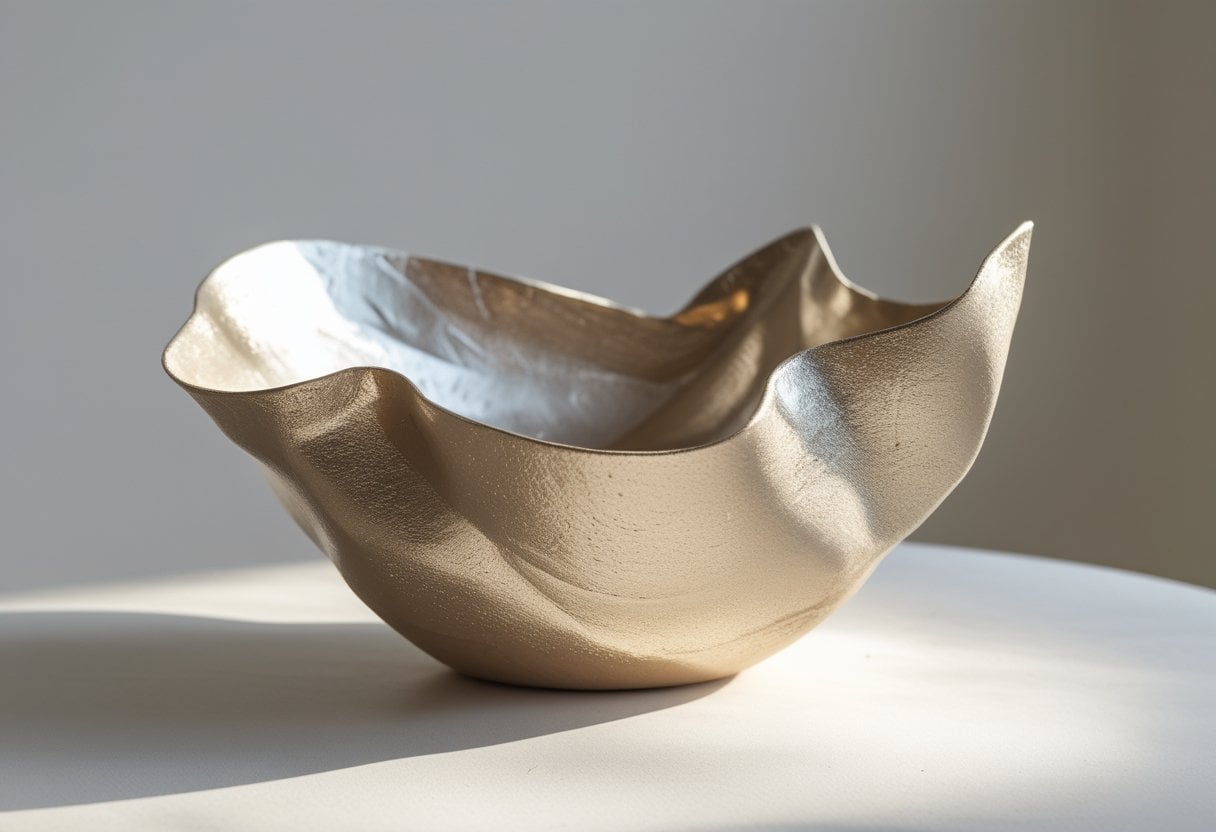
Papier-mâché bowls offer an affordable way to create decorative pieces that rival high-end ceramics. You can mold these bowls using simple newspaper strips or cardboard pulp over an existing bowl as a base.
The technique involves layering paper with adhesive, allowing it to dry completely, then removing it from the mold. Once your bowl has dried, sand the surface smooth for a professional appearance.
A metallic finish elevates the final product significantly. You can apply metallic paint in copper, gold, or bronze tones to the exterior. For added sophistication, consider painting the interior with a contrasting color or lining it with decorative paper.
The result resembles vintage porcelain or expensive ceramic art. These bowls work well as key holders, decorative displays, or centerpieces that look far more costly than their actual materials suggest.
16. Geometric Wood Wall Panels Stained Two-Tone
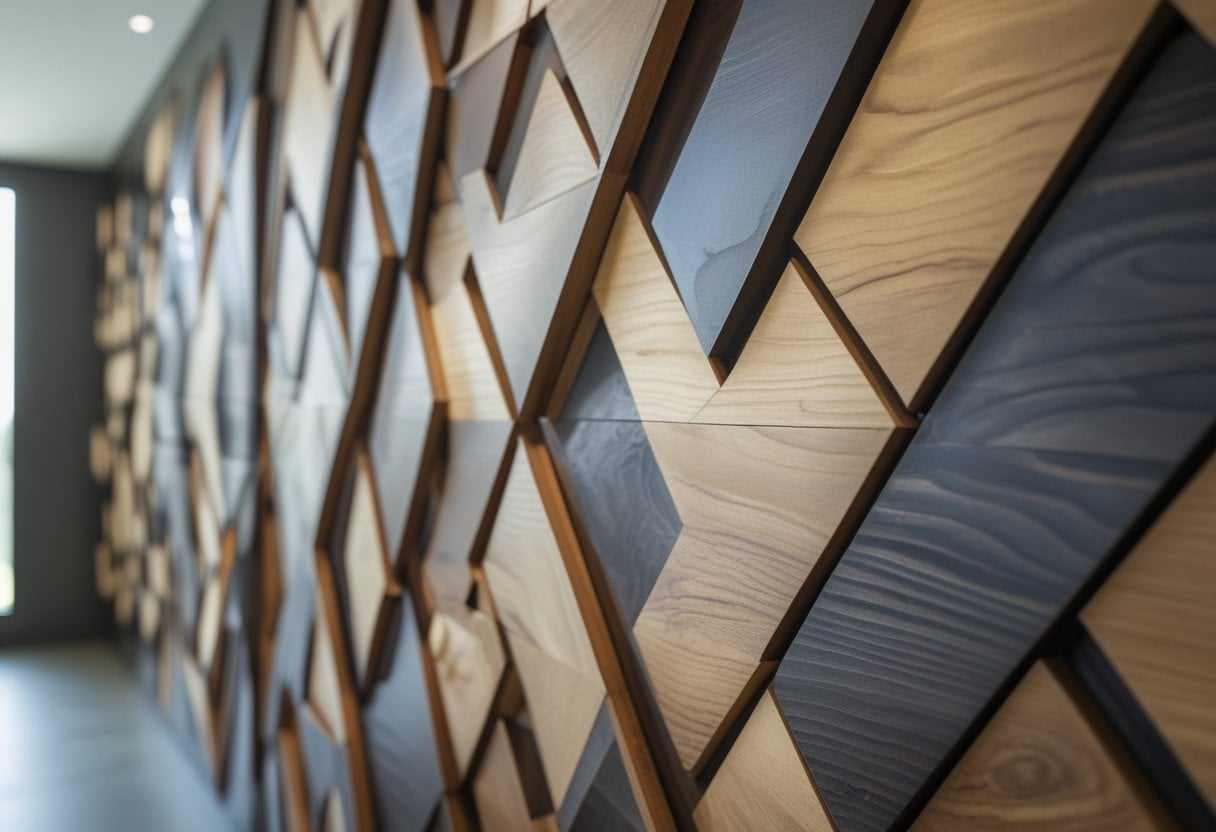
Geometric wood wall panels with two-tone staining create a high-end focal point without the designer price tag. You’ll cut wood pieces at precise angles—typically 30°, 45°, or 60°—to form patterns like triangles, hexagons, or diamonds.
The two-tone finish is what elevates this project from simple to sophisticated. You can stain half your pieces in a dark walnut and leave the others natural, or choose contrasting colors that complement your decor.
Start by sketching your geometric pattern and planning which pieces receive each stain color. Cut your wood with clean edges, then apply your chosen stains before assembly. Dry-fit everything first to ensure your pattern works visually.
Mount the finished panels with appropriate hardware for a secure installation. This project transforms a plain wall into architectural interest that guests will assume cost significantly more than your actual investment.
17. DIY Terrazzo Coasters with Pigment Chips
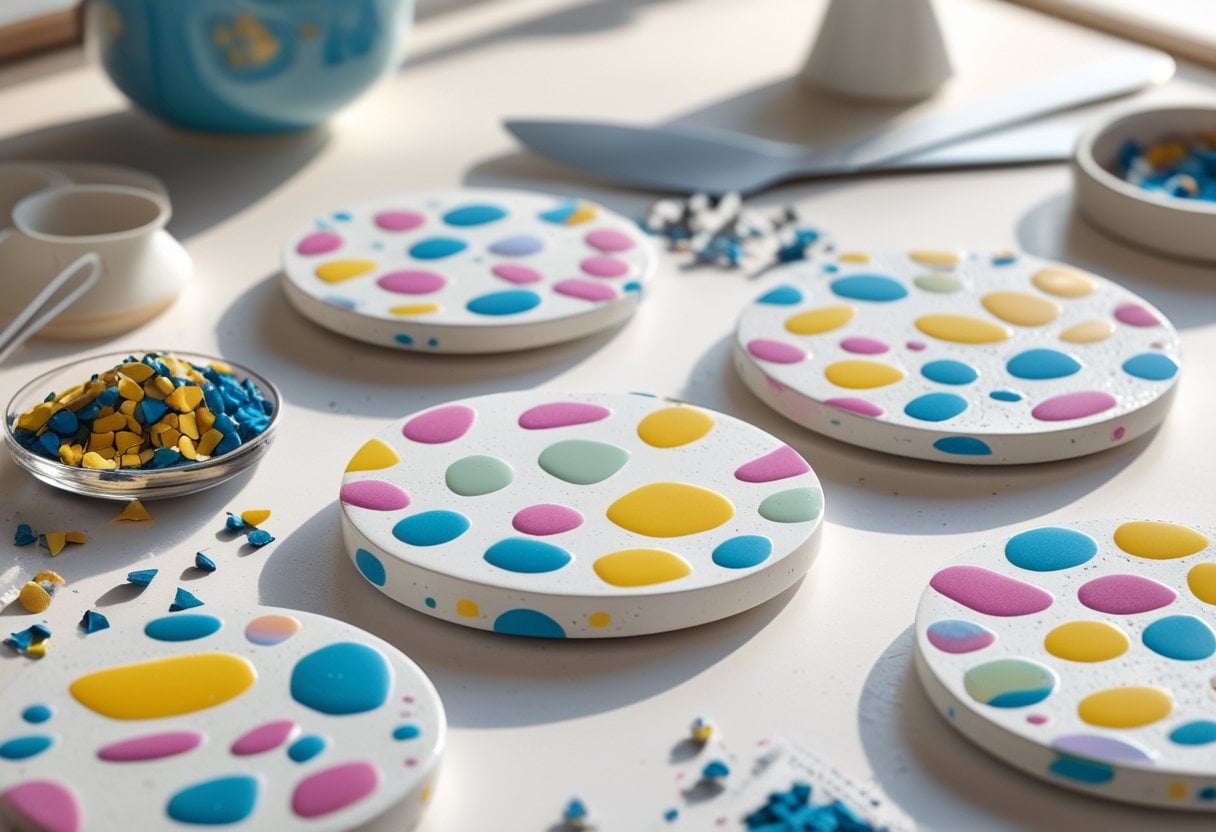
Terrazzo coasters deliver a high-end look without the stone price tag. You’ll create these speckled beauties using Jesmonite or eco-resin as your base material, combined with colorful pigment chips that mimic authentic terrazzo’s distinctive appearance.
The process takes under an hour. First, you’ll make colored chips by mixing pigments with your chosen material. Once these dry, you’ll crush them into small pieces.
Next, mix fresh Jesmonite or resin with your chips and pour the mixture into silicone molds. After the coasters cure completely, sand them smooth for a polished finish. You control both the chip colors and base shade, making each set uniquely yours.
These coasters work well as gifts or personal home accessories. The modern aesthetic fits Mid Century design schemes while remaining versatile enough for various decor styles.
18. Hand-Stamped Linen Napkins with Brass Dye

You can transform plain linen napkins into sophisticated table linens using brass-colored fabric paint and simple stamping tools. The process requires 100% linen or cotton napkins, as synthetic materials won’t absorb the dye properly.
Cut shapes from craft foam or use purchased stamps to create your design. Brush the brass-toned fabric paint onto your stamp and press it firmly onto the napkin. Larger shapes work best and create a cleaner impression than detailed patterns.
The metallic brass finish gives these napkins an upscale appearance that rivals store-bought designer linens. You can customize patterns to match your decor or create themed sets for special occasions.
Once the paint dries and sets according to manufacturer instructions, your stamped napkins become machine washable. This practical craft combines artistic expression with functional tableware that elevates any dining experience.
19. Antique-Mirror Distressing on Store-Bought Mirror
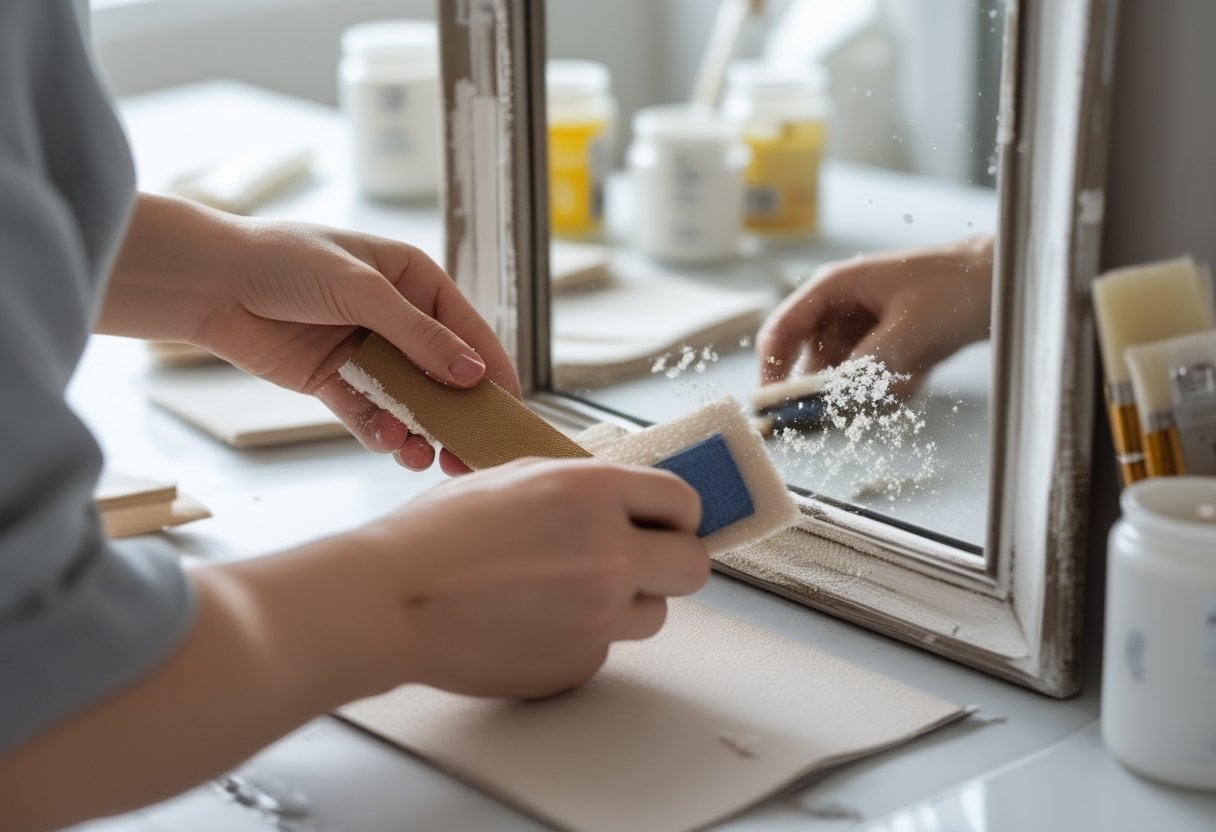
You can transform an inexpensive store-bought mirror into a vintage statement piece using simple distressing techniques. The process involves applying paint to the back of the mirror glass or working with the frame to create an aged, weathered appearance.
Start by removing the mirror from its frame if possible. For the glass itself, you can apply diluted paint or a bleach solution to the back surface, creating spots and streaks that mimic natural aging. Work in layers and allow each application to dry before adding more.
If you prefer working with the frame, sand edges strategically and apply dark paint or glaze to create depth. You can also use vinegar or acetone on the mirror’s backing to achieve authentic-looking distress marks. The layered approach gives you control over the final aged effect.
20. DIY Upholstered Bench with Channel Tufting
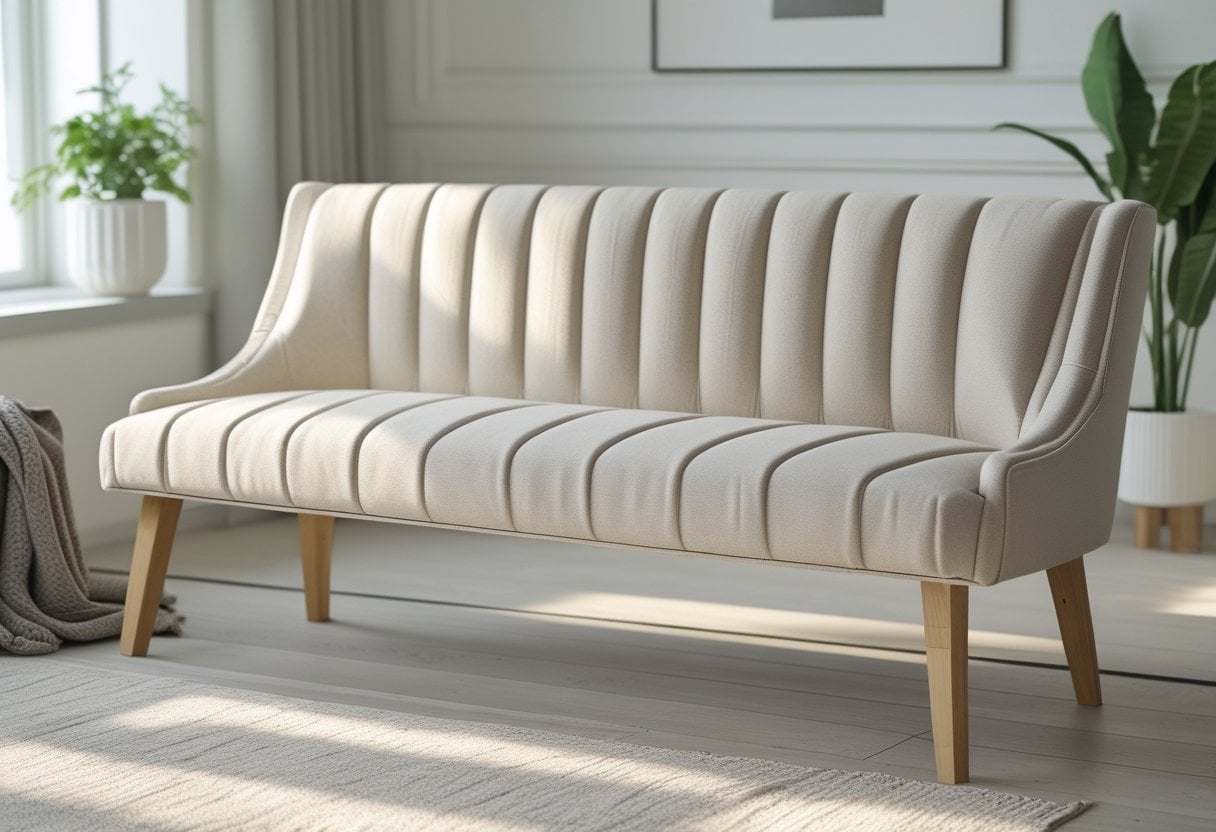
Channel tufting transforms a simple bench into a designer-worthy piece that looks far more expensive than its actual cost. This upholstery technique creates those elegant vertical ridges you see in high-end furniture stores.
You can build the bench frame yourself using basic lumber, or repurpose an existing bench. The waterfall design is one of the easiest furniture styles to construct if you’re starting from scratch.
The channel tufting process involves attaching foam to your base, then wrapping fabric around it to create distinct channels. You’ll secure the fabric at regular intervals to form the signature ridged pattern. Velvet works particularly well for this project, giving you that luxurious appearance.
This project works beautifully for entryways, bedrooms, or dining nooks. The finished piece rivals custom furniture that typically costs hundreds of dollars more.
21. Textured Plaster Accent Panel for Wall Art
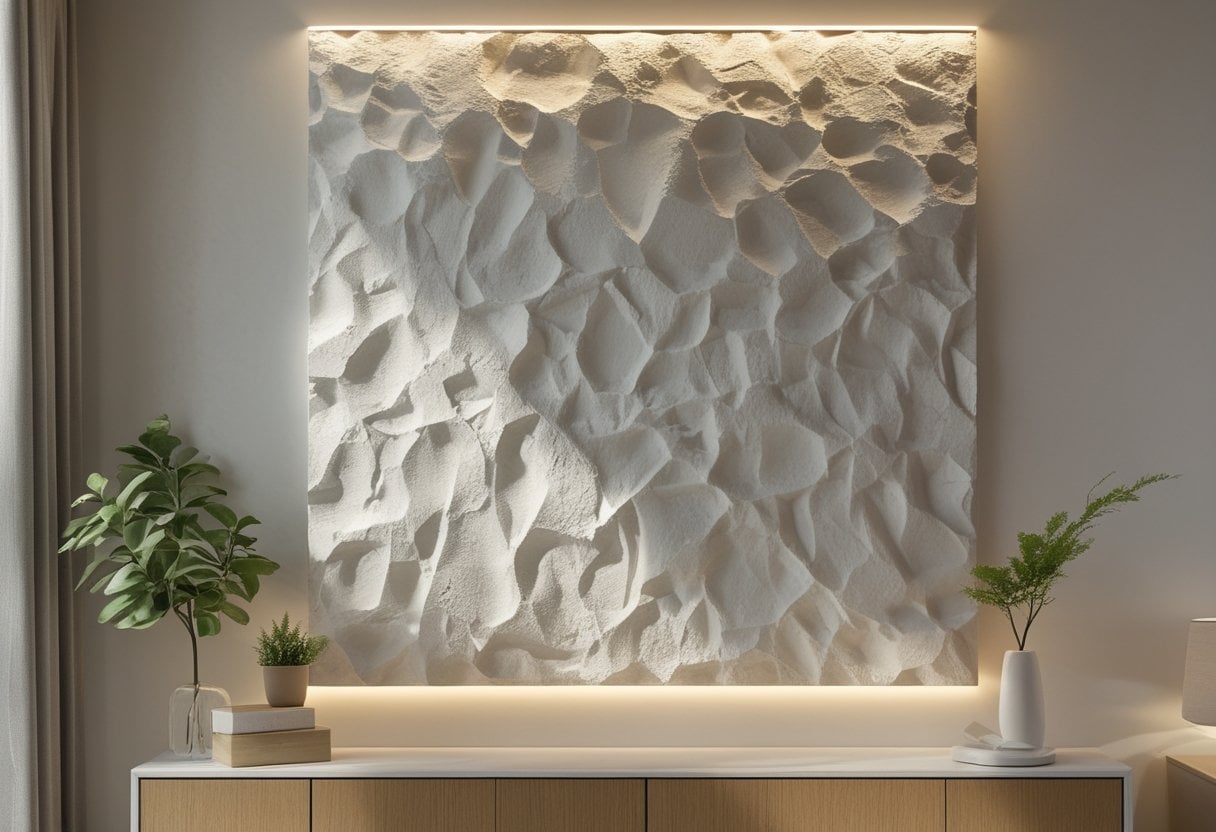
You can create stunning textured plaster wall art using simple materials like joint compound or spackle. These panels deliver the high-end gallery look of expensive designer pieces without the premium price tag.
Start with a canvas or wood panel as your base. Apply plaster or joint compound with a palette knife, creating peaks, valleys, and sweeping textures. You can use tools like window screen pressed into wet plaster for interesting patterns, or work freehand for organic shapes.
Once dry, paint your panel in neutral tones or leave it in classic white for a modern minimalist aesthetic. The dimensional texture catches light beautifully throughout the day, adding visual interest to any room.
This project requires minimal artistic experience and costs less than standard takeout. Your finished piece will look professionally crafted and rival art that sells for hundreds of dollars in boutiques.
22. Gold Foil Edge Floating Shelves
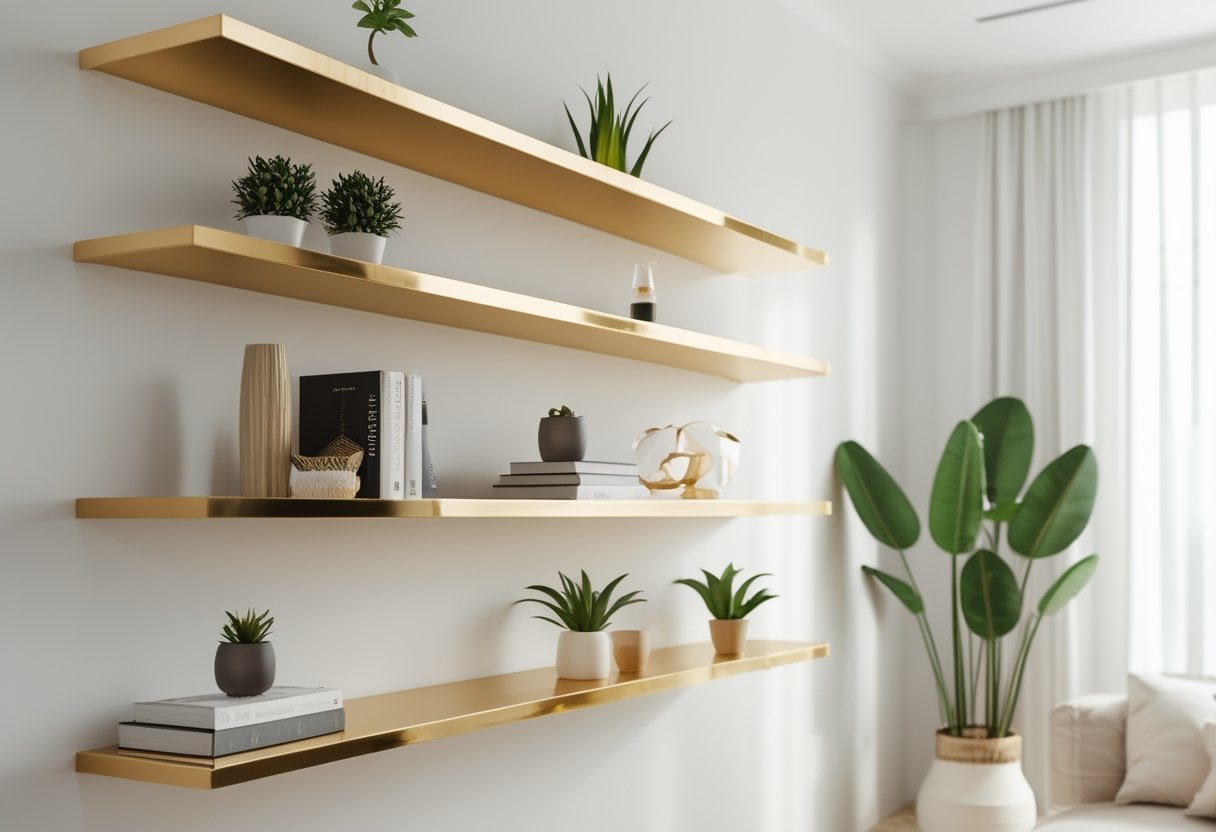
You can transform basic floating shelves into luxurious statement pieces by adding gold foil accents to the edges. This simple upgrade creates a high-end look without the designer price tag.
Start with affordable shelves from stores like IKEA or build your own basic floating shelf. Apply gold leaf or metallic gold foil tape along the front edge and sides for an elegant finish. The reflective quality of the gold catches light beautifully and adds warmth to any room.
This technique works particularly well in bathrooms, living rooms, or home offices where you want to display decorative items. The metallic detail elevates the entire shelf while keeping your budget intact.
You’ll spend minimal time and money on materials, yet the result looks like something from an upscale furniture boutique.
23. IKEA Bekvam Spice Rack Refinish to High Gloss Walnut
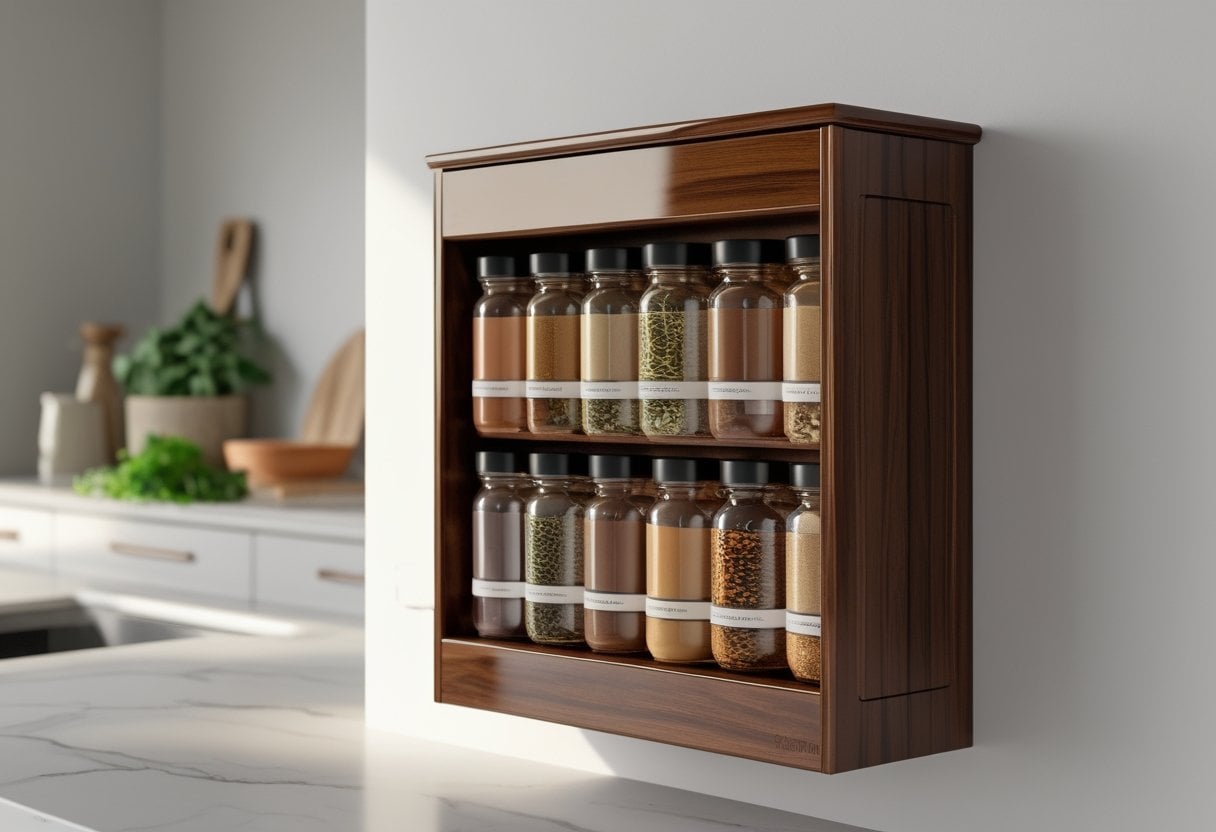
The IKEA Bekvam spice rack costs around $7 and provides a solid aspen wood base for transformation. You can elevate this basic piece into a high-end looking accessory with walnut stain and a glossy finish.
Start by lightly sanding the raw wood to prepare the surface. Apply a walnut stain like Minwax Special Walnut in thin, even coats. Allow each layer to dry completely before adding the next.
The key to achieving an expensive appearance is the high gloss topcoat. Use a polyurethane or lacquer finish in gloss sheen, applying multiple thin coats rather than one thick layer. Sand lightly between coats with fine-grit sandpaper for a smooth result.
This simple refinishing process transforms the inexpensive rack into a piece that resembles custom woodwork. The rich walnut tone and glossy finish create a polished look that appears far more costly than the actual investment.
24. Painted Faux-Marble Picture Frames
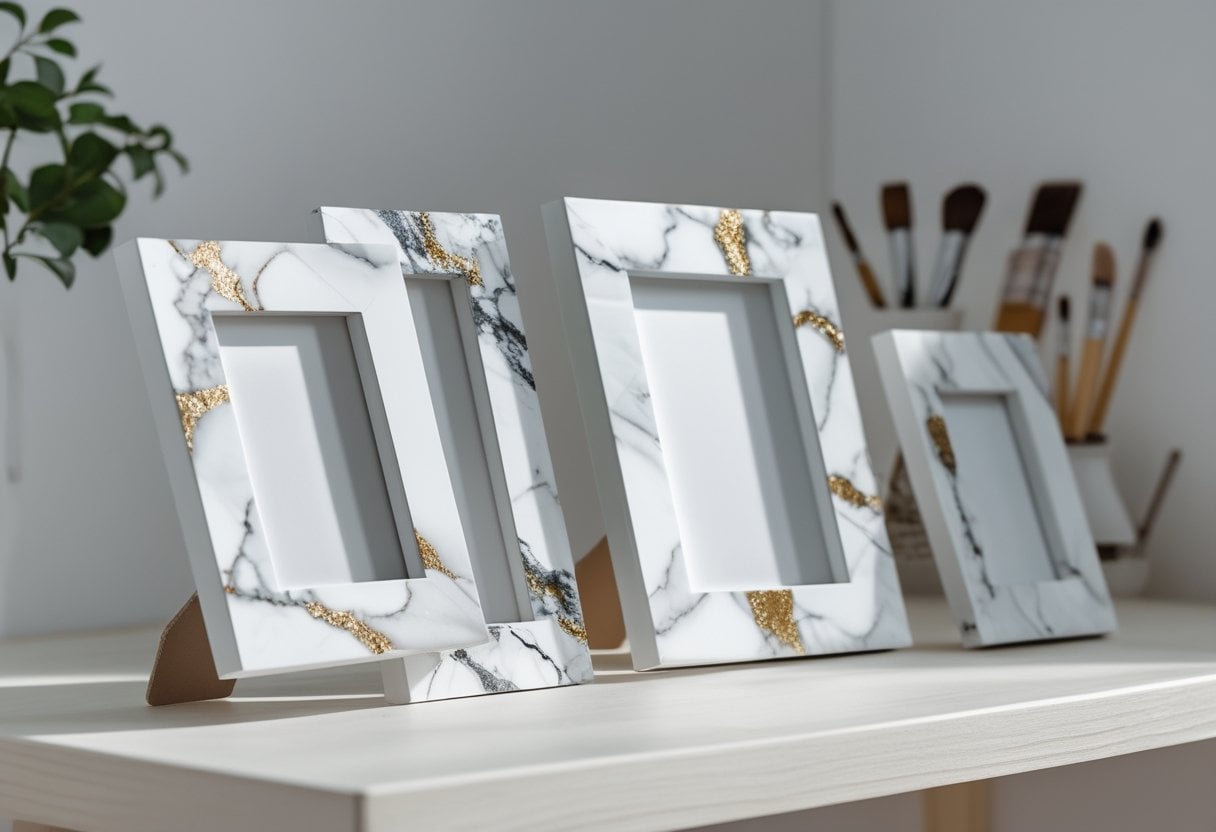
Transform basic picture frames into luxurious-looking pieces with faux marble painting techniques. You can start with inexpensive thrifted frames or simple wooden ones from craft stores.
The marble effect requires just a few supplies: white and gray acrylic paint, a small brush, and a feather or thin tool for creating veins. Apply a white base coat first, then add gray streaks in diagonal patterns to mimic natural marble’s characteristic lines.
Contact paper with marble patterns offers an even simpler alternative if you prefer to skip the painting process. Simply measure, cut, and apply it to your frame surfaces for an instant transformation.
These frames work especially well when grouped together on a wall or shelf. The high-end appearance makes them look far more expensive than their actual cost, and guests will likely assume you purchased them from an upscale home decor store.
25. DIY Silk Floral Arrangement in Concrete Vase
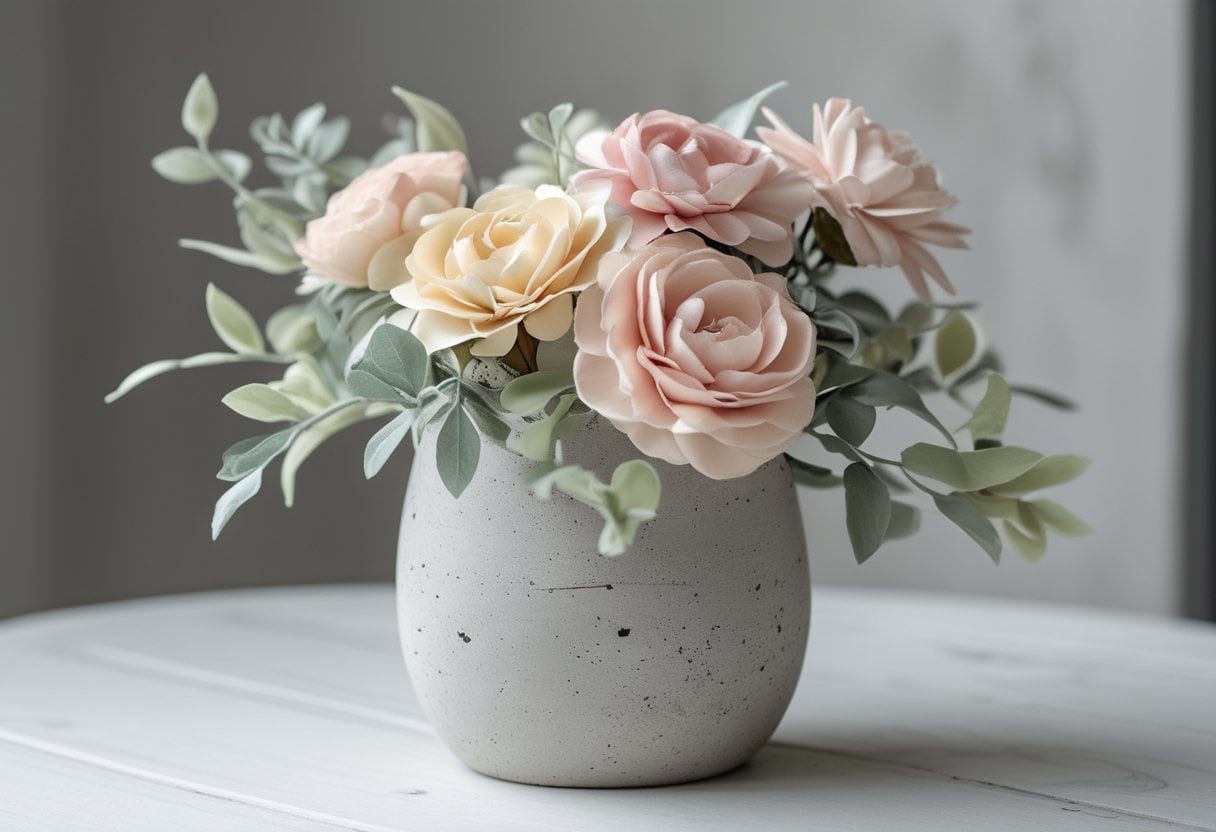
A silk floral arrangement paired with a concrete vase creates an upscale look that rivals expensive store-bought decor. The industrial texture of concrete provides a sophisticated contrast to delicate silk blooms.
You can make a concrete vase by pouring quick-setting concrete into a mold with a plastic container insert to form the cavity. After it sets and you remove the mold, you have a modern vessel ready for arranging.
Choose large silk flowers as your focal point and surround them with smaller blooms and greenery. Silk flowers offer the advantage of staying in perfect condition year-round without maintenance. You can secure stems with floral foam at the base of your concrete vase.
This combination of raw concrete and elegant silk flowers achieves a designer aesthetic at a fraction of retail prices.
26. Minimalist Floating Media Console from Plywood

A floating media console built from plywood delivers a high-end look without the luxury price tag. The wall-mounted design eliminates visible legs, creating clean lines that enhance any modern living space.
You can construct this piece using a single sheet of 3/4-inch plywood and basic woodworking tools. A pocket-hole jig simplifies the assembly process, while a French cleat system provides secure wall mounting. The floating effect saves floor space and makes cleaning underneath effortless.
The console can accommodate your TV components, gaming systems, and cable boxes while keeping everything organized. You can customize the dimensions to fit your wall and add cabinet doors for concealed storage.
Paint finishes create a sleek, contemporary appearance, or you can apply wood stain to showcase the natural grain. This project suits beginners yet produces professional results that rival store-bought furniture costing significantly more.
27. Layered Neutral Gallery Wall with Custom Mats
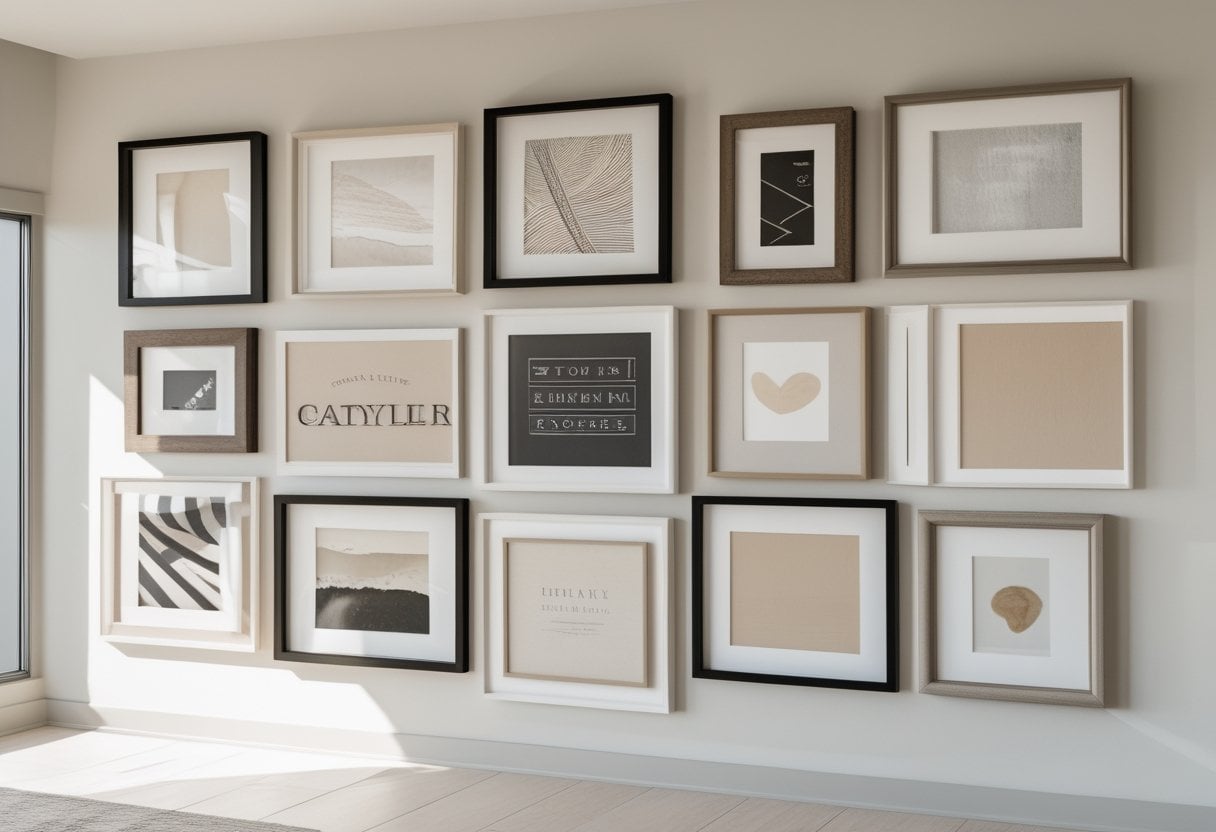
A gallery wall transforms from basic to boutique when you add custom-cut mats to budget frames. You can use an X-Acto mat cutter and metal ruler to cut heavy cardstock that fits standard 8×10 or 11×14 frames. The white margin creates the illusion that small prints are gallery-sized pieces.
Stick with neutral tones across your frames and mats to maintain a cohesive look. Black, white, and natural wood finishes work well together without competing for attention.
Layer your frames along a staircase or main wall, keeping spacing consistent at 6 to 9 inches between centers. Mix typography prints with simple sketches for visual interest. A repeating element like mat style or frame color prevents the arrangement from looking cluttered while maintaining that curated appearance.
28. Stenciled Moroccan Tile Rug on Concrete Floor
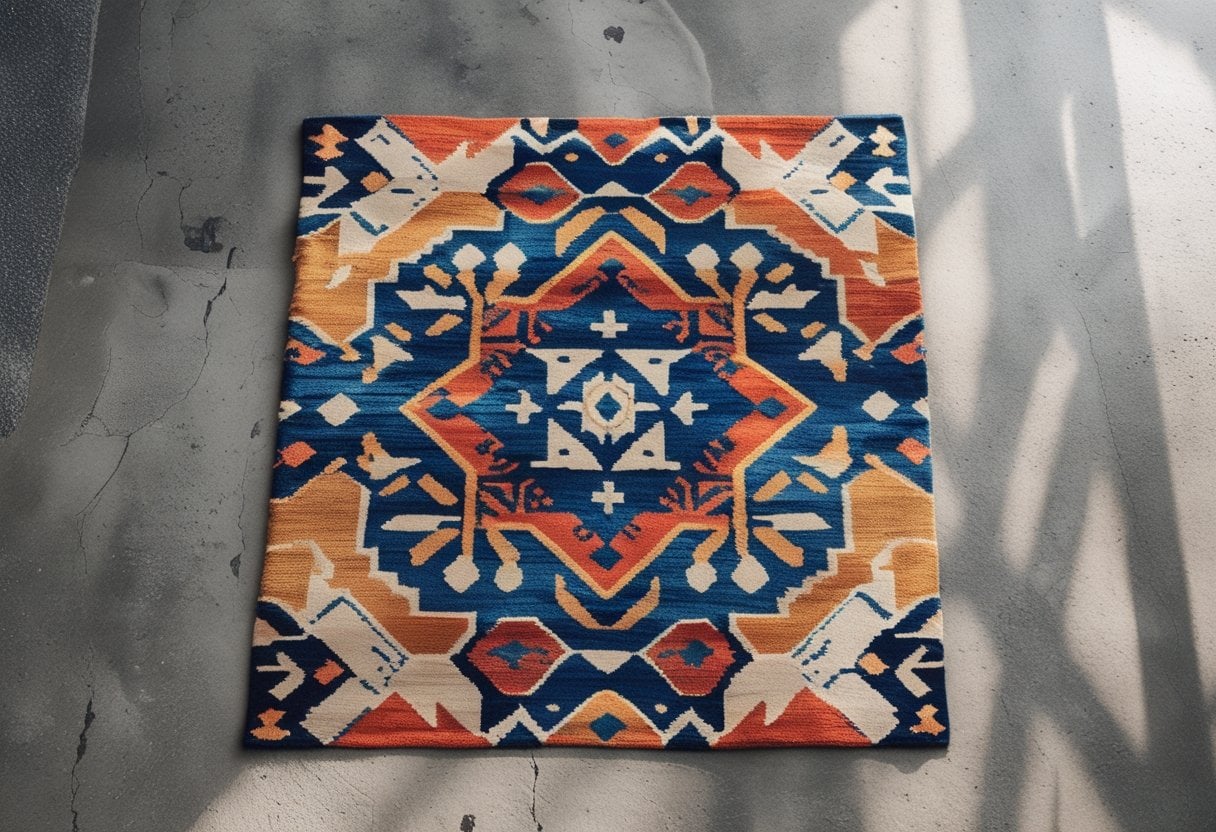
You can transform plain concrete floors into stunning decorative surfaces using stencils and concrete stain. This project creates the appearance of a patterned rug without the cost of actual Moroccan cement tiles.
Start with a clean, sealed concrete floor. Choose durable vinyl or mylar stencils in Moroccan patterns for best results. You’ll apply the stencil in a runner-shaped pattern to mimic an area rug rather than covering the entire floor.
The technique works well for patios, porches, and interior concrete floors. Use concrete stain in your chosen colors to fill in the stencil design. This approach lets you hide minor floor imperfections while adding visual interest to utilitarian spaces.
The materials cost considerably less than installing actual tile or purchasing large area rugs. Your finished floor provides a permanent decorative element that won’t shift or require replacement.
29. DIY Hand-Poured Soy Candle in Ceramic Vessel
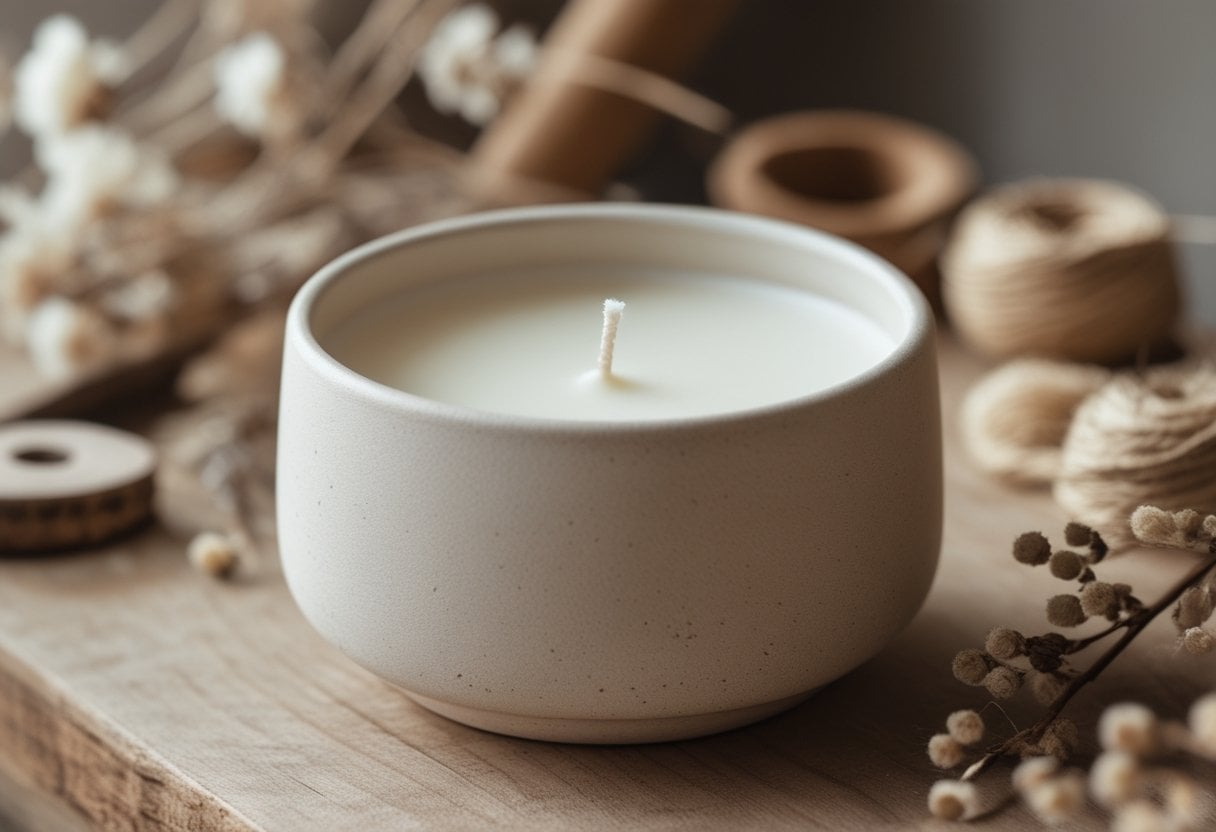
Hand-poured soy candles in ceramic vessels create an upscale look without the boutique price tag. You can purchase ceramic containers from thrift stores or craft shops, then fill them with soy wax and your preferred fragrance. The process requires melting soy wax flakes, adding essential oils or candle fragrance, and securing a wick in the center of your vessel.
The natural properties of soy wax provide a clean burn while the ceramic container adds weight and sophistication. You can select vessels in various colors and textures to match your decor style. A simple white ceramic container offers a minimalist aesthetic, while vintage or textured pottery provides character.
These candles rival luxury brands that charge premium prices. Your friends and family will assume you spent significantly more than the actual material costs.
30. Metallic Spray-Painted Terracotta Pot Set
Plain terracotta pots cost just a few dollars, but metallic spray paint transforms them into designer-quality planters. You can create a cohesive set using gold, silver, or copper finishes that rival boutique versions costing ten times more.
The process requires minimal effort. Clean your pots thoroughly and let them dry completely. Apply a primer designed for porous surfaces to ensure smooth coverage. Then spray two to three light coats of metallic paint, allowing each layer to dry between applications.
You can arrange multiple pots in varying sizes for a dramatic display on your porch or patio. The metallic finish catches light beautifully and adds sophistication to any plant collection. This project works equally well for indoor or outdoor use, making it a versatile addition to your home décor.
Key Materials for High-End Crafting
The difference between a craft that looks handmade and one that appears professionally designed often comes down to your material choices and tools. Smart selections in these areas can elevate budget-friendly projects to look like premium decor pieces.
Selecting Quality Tools and Supplies
Your tools form the foundation of polished results. Invest in a high-quality hot glue gun with adjustable temperature settings, sharp precision scissors, and a self-healing cutting mat for clean edges. These core items will serve you across multiple projects and prevent amateur-looking mistakes.
For paint projects, choose artist-grade acrylic paints over craft paints. The pigment concentration is higher, coverage is smoother, and the finish appears more professional. Add quality brushes with synthetic or natural bristles that won’t shed during application.
Essential quality items to prioritize:
- Metal straightedge ruler for precise measurements
- Fine-grit sandpaper (220-400 grit) for smooth finishes
- Professional-grade Mod Podge or decoupage medium
- White primer for proper paint adhesion
- Clear acrylic sealer in matte or gloss finish
Your adhesives matter significantly. Wood glue creates stronger bonds than hot glue for permanent projects, while spray adhesive provides even coverage without lumps or texture showing through delicate materials.
Affordable Alternatives to Expensive Components
Dollar stores stock surprising substitutes for costly craft supplies. Picture frames, glass vases, and ceramic containers provide excellent bases for transformations at a fraction of boutique prices. Look for items with clean lines and simple shapes that you can customize.
Replace expensive gold leaf with gold acrylic paint mixed with a small amount of metallic wax paste. This combination creates authentic-looking gilded finishes on furniture, frames, and decorative objects. Fabric remnants from discount stores work perfectly for upholstery projects instead of designer textiles.
Contact paper mimics marble, wood grain, and other premium surfaces for under $5 per roll. Thrift stores offer genuine brass, crystal, and wood pieces that simply need cleaning or minor updates. Natural materials like branches, stones, and pinecones cost nothing but add organic texture that expensive stores charge premium prices for.
Techniques to Achieve a Luxe Finish
The difference between craft-store obvious and designer-worthy often comes down to surface treatment and precision. Small adjustments in how you apply finishes and assemble components can elevate budget materials into pieces that look genuinely expensive.
Paints, Finishes, and Embellishments
Spray paint delivers the most professional finish for DIY projects because it eliminates brush strokes entirely. Use multiple thin coats rather than one thick application to prevent drips and achieve even coverage. Metallic finishes in gold, brass, or copper instantly add perceived value to any project.
Consider layering finishes for depth. A base coat of matte paint topped with a glossy or satin sealer creates dimension that flat paint cannot achieve. High-gloss finishes work particularly well for modern aesthetics, while matte topcoats suit contemporary styles.
Premium-looking embellishments include:
- Metallic wax rubbed over raised details
- Gold or silver leaf applied to edges
- Clear epoxy resin for glass-like surfaces
- Antiquing glaze in crevices for aged effects
Texture matters as much as color. Adding a coat of chalky finish paint or using sandpaper to distress edges strategically creates visual interest. Natural patina techniques using vinegar and salt on metal surfaces produce authentic aging that mimics expensive vintage pieces.
Attention to Detail: Cutting, Gluing, and Assembly
Clean cuts make the biggest difference in finished appearance. Use sharp blades and measure twice before cutting any material. Jagged edges or uneven lines immediately signal amateur work, regardless of how expensive your materials are.
Hot glue works quickly but often shows residue or creates strings. For visible joints, use E6000 or clear-drying craft glue applied with precision. Remove excess adhesive immediately with a damp cloth before it dries.
Assembly best practices:
- Align all components before applying permanent adhesive
- Use painter’s tape to hold pieces while glue sets
- Sand joints smooth after assembly
- Fill gaps with wood filler or caulk before painting
Hide hardware whenever possible or upgrade to brushed metal instead of plastic. Take time to ensure level placement of hung elements. Even slight angles become obvious once a project is displayed and undermine the entire finished look.


